


ComfyUI FLUX: Guide to Setup, Workflows such as FLUX-ControlNet, FLUX-LoRA, and FLUX-IPAdapter... and Online Access
Updated: 8/26/2024
Hello, fellow AI enthusiasts! 👋 Welcome to our introductory guide on using FLUX within ComfyUI. FLUX is a cutting-edge model developed by Black Forest Labs. 🌟 In this tutorial, we'll dive into the essentials of ComfyUI FLUX, showcasing how this powerful model can enhance your creative process and help you push the boundaries of AI-generated art. 🚀
We will cover:
1. Introduction to FLUX
2. Different Versions of FLUX
3. FLUX Hardware Requirements
- 3.1. FLUX.1 [Pro] Hardware Requirements
- 3.2. FLUX.1 [Dev] Hardware Requirements
- 3.3. FLUX.1 [Schnell] Hardware Requirements
4. How to install FLUX in ComfyUI
- 4.1. Installing or Updating ComfyUI
- 4.2. Downloading ComfyUI FLUX Text Encoders and CLIP Models
- 4.3. Downloading FLUX.1 VAE Model
- 4.4. Downloading FLUX.1 UNET Model
5. ComfyUI FLUX Workflow | Download, Online Access, and Guide
- 5.1. ComfyUI Workflow: FLUX Txt2Img
- 5.2. ComfyUI Workflow: FLUX Img2Img
- 5.3. ComfyUI Workflow: FLUX LoRA
- 5.4. ComfyUI Workflow: FLUX ControlNet
- 5.5. ComfyUI Workflow: FLUX Inpainting
- 5.6. ComfyUI Workflow: FLUX NF4 & Upscale
- 5.7. ComfyUI Workflow: FLUX IPAdapter
- 5.8. ComfyUI Workflow: Flux LoRA Trainer
- 5.9. ComfyUI Workflow: Flux Latent Upscale
1. Introduction to FLUX
FLUX.1, the cutting-edge AI model by Black Forest Labs, is revolutionizing the way we create images from text descriptions. With its unparalleled ability to generate stunningly detailed and complex images that closely match the input prompts, FLUX.1 sets itself apart from the competition. The secret behind FLUX.1's success lies in its unique hybrid architecture, which combines different types of transformer blocks and is powered by an impressive 12 billion parameters. This enables FLUX.1 to produce visually captivating images that accurately represent the text descriptions with remarkable precision.
One of the most exciting aspects of FLUX.1 is its versatility in generating images across various styles, from photorealistic to artistic. FLUX.1 even has the remarkable ability to seamlessly incorporate text within the generated images, a feat that many other models struggle to achieve. Moreover, FLUX.1 is renowned for its exceptional prompt adherence, effortlessly handling both simple and complex descriptions. This has led to FLUX.1 being frequently compared to other well-known models like Stable Diffusion and Midjourney, with FLUX.1 often emerging as the preferred choice due to its user-friendly nature and top-notch results.
The impressive capabilities of FLUX.1 make it an invaluable tool for a wide range of applications, from creating stunning visual content and inspiring innovative designs to facilitating scientific visualization. FLUX.1's ability to generate highly detailed and accurate images from text descriptions opens up a world of possibilities for creative professionals, researchers, and enthusiasts alike. As the field of AI-generated imagery continues to evolve, FLUX.1 stands at the forefront, setting a new standard for quality, versatility, and ease of use.
Black Forest Labs, the pioneering AI company behind the groundbreaking FLUX.1, was founded by Robin Rombach, a renowned figure in the AI industry who previously served as a core member of Stability AI. If you're eager to learn more about Black Forest Labs and their revolutionary work with FLUX.1, be sure to visit their official website at https://blackforestlabs.ai/.

2. Different Versions of FLUX
FLUX.1 comes in three different versions, each designed to cater to specific user needs:
- FLUX.1 [pro]: This is the top-of-the-line version that offers the best quality and performance, perfect for professional use and high-end projects.
- FLUX.1 [dev]: Optimized for non-commercial use, this version maintains high-quality output while being more efficient, making it great for developers and enthusiasts.
- FLUX.1 [schnell]: This version is all about speed and being lightweight, making it perfect for local development and personal projects. It's also open-source and available under the Apache 2.0 license, so it's accessible to a wide range of users.
| Name | HuggingFace repo | License | md5sum |
FLUX.1 [pro] | Only available in our API. | ||
FLUX.1 [dev] | https://huggingface.co/black-forest-labs/FLUX.1-dev | FLUX.1-dev Non-Commercial License | a6bd8c16dfc23db6aee2f63a2eba78c0 |
FLUX.1 [schnell] | https://huggingface.co/black-forest-labs/FLUX.1-schnell | apache-2.0 | a9e1e277b9b16add186f38e3f5a34044 |
3. FLUX Hardware Requirements
3.1. FLUX.1 [Pro] Hardware Requirements
- Recommended GPU: NVIDIA RTX 4090 or equivalent with 24 GB or more VRAM. The model is optimized for high-end GPUs to handle its complex operations.
- RAM: 32 GB or more system memory.
- Disk Space: Approximately 30 GB.
- Compute Requirements: High precision is required; use FP16 (half-precision) to avoid out-of-memory errors. For best results, it is suggested to use the
fp16Clip model variant for maximum quality. - Other Requirements: A fast SSD is recommended for quicker loading times and overall performance.
3.2. FLUX.1 [Dev] Hardware Requirements
- Recommended GPU: NVIDIA RTX 3080/3090 or equivalent with at least 16 GB of VRAM. This version is a bit more lenient on hardware compared to the Pro model but still requires substantial GPU power.
- RAM: 16 GB or more system memory.
- Disk Space: Approximately 25 GB.
- Compute Requirements: Similar to Pro, use FP16 models, but with a slight tolerance for lower precision computations. Can use
fp16orfp8Clip models based on GPU capabilities. - Other Requirements: A fast SSD is recommended for optimal performance.
3.3. FLUX.1 [Schnell] Hardware Requirements
- Recommended GPU: NVIDIA RTX 3060/4060 or equivalent with 12 GB VRAM. This version is optimized for faster inference and lower hardware demands.
- RAM: 8 GB or more system memory.
- Disk Space: Approximately 15 GB.
- Compute Requirements: This version is less demanding and allows for
fp8computations if running out of memory. It is designed to be fast and efficient, with a focus on speed rather than ultra-high quality. - Other Requirements: SSD is useful but not as critical as in Pro and Dev versions.
4. How to install FLUX in ComfyUI
4.1. Installing or Updating ComfyUI
To effectively use FLUX.1 within the ComfyUI environment, it's crucial to ensure that you have the latest version of ComfyUI installed. This version supports the necessary features and integrations required for FLUX.1 models.
4.2. Downloading ComfyUI FLUX Text Encoders and CLIP Models
For optimal performance and accurate text-to-image generation using FLUX.1, you will need to download specific text encoders and CLIP models. The following models are essential, depending on your system's hardware:
| Model File Name | Size | Note | Link |
t5xxl_fp16.safetensors | 9.79 GB | For better results, if you have high VRAM and RAM(more than 32GB RAM). | Download |
t5xxl_fp8_e4m3fn.safetensors | 4.89 GB | For lower memory usage (8-12GB) | Download |
clip_l.safetensors | 246 MB | Download |
Steps to Download and Install:
- Download the
clip_l.safetensorsmodel. - Depending on your system's VRAM and RAM, download either
t5xxl_fp8_e4m3fn.safetensors(for lower VRAM) ort5xxl_fp16.safetensors(for higher VRAM and RAM). - Place the downloaded models in the
ComfyUI/models/clip/directory. Note: If you have previously used SD 3 Medium, you may already have these models.
4.3. Downloading FLUX.1 VAE Model
The Variational Autoencoder (VAE) model is crucial for improving image generation quality in FLUX.1. The following VAE model is available for download:
| File Name | Size | Link |
ae.safetensors | 335 MB | Download(opens in a new tab) |
Steps to Download and Install:
- Download the
ae.safetensorsmodel file. - Place the downloaded file in the
ComfyUI/models/vaedirectory. - For easy identification, it is recommended to rename the file to
flux_ae.safetensors.
4.4. Downloading FLUX.1 UNET Model
The UNET model is the backbone for image synthesis in FLUX.1. Depending on your system's specifications, you can choose between different variants:
| File Name | Size | Link | Note |
flux1-dev.safetensors | 23.8GB | Download | If you have high VRAM and RAM. |
flux1-schnell.safetensors | 23.8GB | Download | For lower memory usage |
Steps to Download and Install:
- Download the appropriate UNET model based on your system's memory configuration.
- Place the downloaded model file in the
ComfyUI/models/unet/directory.
5. ComfyUI FLUX Workflow | Download, Online Access, and Guide
We will continuously update the ComfyUI FLUX Workflow to provide you with the latest and most comprehensive workflows for generating stunning images using ComfyUI FLUX.
5.1. ComfyUI Workflow: FLUX Txt2Img
5.1.1. ComfyUI FLUX Txt2Img : Download
5.1.2. ComfyUI FLUX Txt2Img Online Version: ComfyUI FLUX Txt2Img
At RunComfy Platform, our online version preloads all the necessary modes and nodes for you. Plus, we offer high-performance GPU machines, ensuring you can enjoy the ComfyUI FLUX Txt2Img experience effortlessly.
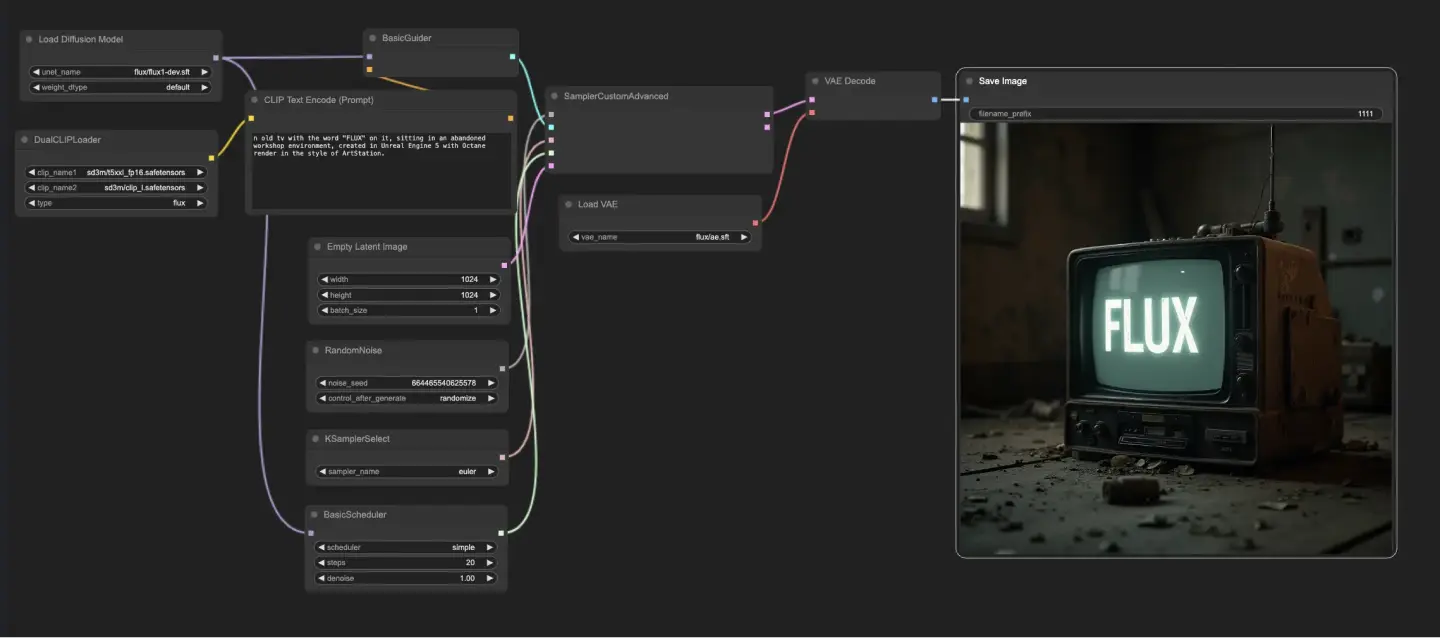
5.1.3. ComfyUI FLUX Txt2Img Explanation:
The ComfyUI FLUX Txt2Img workflow begins by loading the essential components, including the FLUX UNET (UNETLoader), FLUX CLIP (DualCLIPLoader), and FLUX VAE (VAELoader). These form the foundation of the ComfyUI FLUX image generation process.
- UNETLoader: Loads the UNET model for image generation.
- Checkpoint: flux/flux1-schnell.sft; flux/flux1-dev.sft
- DualCLIPLoader: Loads the CLIP model for text encoding.
- Embedding Model 1: sd3m/t5xxl_fp8_e4m3fn.safetensors; sd3m/t5xxl_fp16.safetensors
- Embedding Model 2: sd3m/clip_g.safetensors; sd3m/clip_l.safetensors
- Grouping: The grouping strategy for the CLIP model is flux
- VAELoader: Loads the Variational Autoencoder (VAE) model for decoding latent representations.
- VAE model: flux/ae.sft
The text prompt, which describes the desired output, is encoded using the CLIPTextEncode. This node takes the text prompt as input and outputs the encoded text conditioning, which guides ComfyUI FLUX during generation.
To initiate the ComfyUI FLUX generation process, an empty latent representation is created using the EmptyLatentImage. This serves as the starting point for ComfyUI FLUX to build upon.
The BasicGuider plays a crucial role in guiding the ComfyUI FLUX generation process. It takes the encoded text conditioning and the loaded FLUX UNET as inputs, ensuring that the generated output aligns with the provided text description.
The KSamplerSelect allows you to choose the sampling method for ComfyUI FLUX generation, while the RandomNoise generates random noise as input for ComfyUI FLUX. The BasicScheduler schedules the noise levels (sigmas) for each step in the generation process, controlling the level of detail and clarity in the final output.
The SamplerCustomAdvanced brings together all the components of the ComfyUI FLUX Txt2Img workflow. It takes the random noise, guider, selected sampler, scheduled sigmas, and empty latent representation as inputs. Through an advanced sampling process, it generates a latent representation that represents the text prompt.
Finally, the VAEDecode decodes the generated latent representation into the final output using the loaded FLUX VAE. The SaveImage allows you to save the generated output to a specified location, preserving the stunning creation made possible by the ComfyUI FLUX Txt2Img workflow.
5.2. ComfyUI Workflow: FLUX Img2Img
5.2.1. ComfyUI FLUX Img2Img: Download
5.2.2. ComfyUI FLUX Img2Img Online Version: ComfyUI FLUX Img2Img
At RunComfy Platform, our online version preloads all the necessary modes and nodes for you. Plus, we offer high-performance GPU machines, ensuring you can enjoy the ComfyUI FLUX Img2Img experience effortlessly.
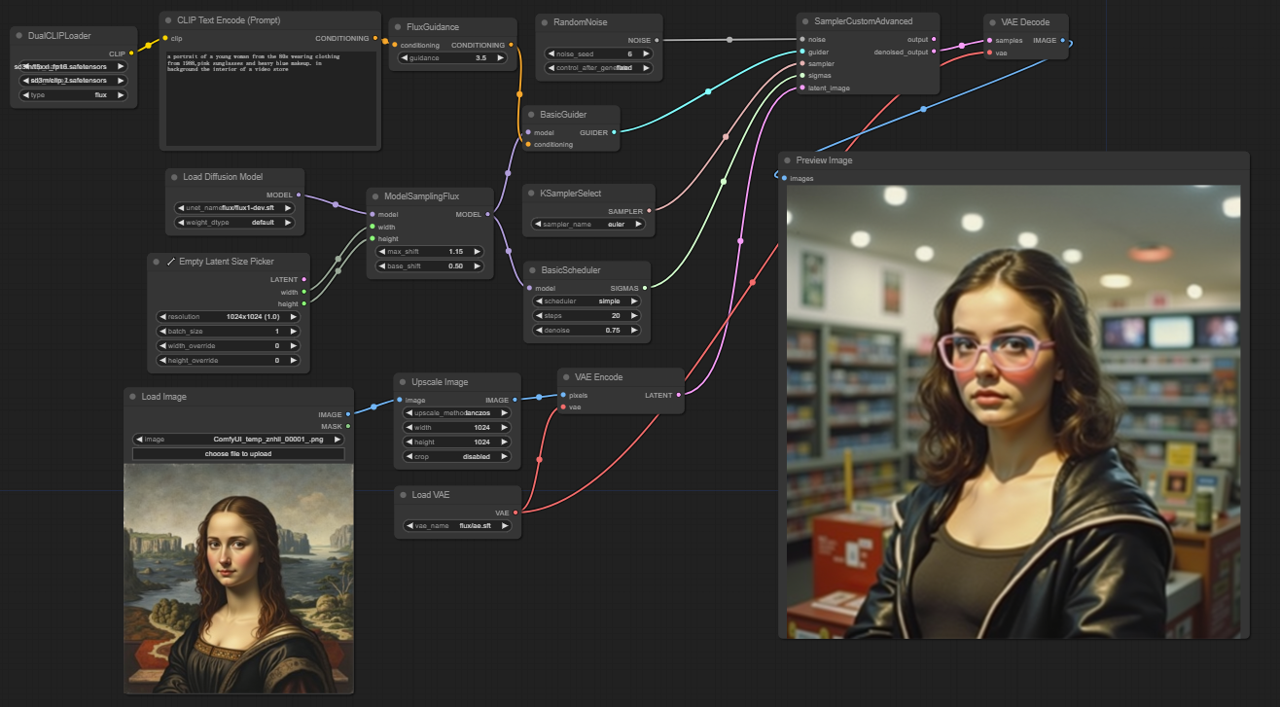
5.2.3. ComfyUI FLUX Img2Img Explanation:
The ComfyUI FLUX Img2Img workflow builds upon the power of ComfyUI FLUX to generate outputs based on both text prompts and input representations. It starts by loading the necessary components, including the CLIP model (DualCLIPLoader), UNET model (UNETLoader), and VAE model (VAELoader).
- UNETLoader: Loads the UNET model for image generation.
- Checkpoint: flux/flux1-schnell.sft; flux/flux1-dev.sft
- DualCLIPLoader: Loads the CLIP model for text encoding.
- Embedding Model 1: sd3m/t5xxl_fp8_e4m3fn.safetensors; sd3m/t5xxl_fp16.safetensors
- Embedding Model 2: sd3m/clip_g.safetensors; sd3m/clip_l.safetensors
- Grouping: The grouping strategy for the CLIP model is flux
- VAELoader: Loads the Variational Autoencoder (VAE) model for decoding latent representations.
- VAE model: flux/ae.sft
The input representation, which serves as the starting point for the ComfyUI FLUX Img2Img process, is loaded using the LoadImage. The ImageScale then scales the input representation to the desired size, ensuring compatibility with ComfyUI FLUX.
The scaled input representation undergoes encoding using the VAEEncode, converting it into a latent representation. This latent representation captures the essential features and details of the input, providing a foundation for ComfyUI FLUX to work with.
The text prompt, describing the desired modifications or enhancements to the input, is encoded using the CLIPTextEncode. The FluxGuidance then applies guidance to the conditioning based on the specified guidance scale, influencing the strength of the text prompt's influence on the final output.
The ModelSamplingFlux sets the sampling parameters for ComfyUI FLUX, including the timestep respacing, padding ratio, and output dimensions. These parameters control the granularity and resolution of the generated output.
The KSamplerSelect allows you to choose the sampling method for ComfyUI FLUX generation, while the BasicGuider guides the generation process based on the encoded text conditioning and the loaded FLUX UNET.
Random noise is generated using the RandomNoise, and the BasicScheduler schedules the noise levels (sigmas) for each step in the generation process. These components introduce controlled variations and fine-tune the details in the final output.
The SamplerCustomAdvanced brings together the random noise, guider, selected sampler, scheduled sigmas, and the latent representation of the input. Through an advanced sampling process, it generates a latent representation that incorporates the modifications specified by the text prompt while preserving the essential features of the input.
Finally, the VAEDecode decodes the denoised latent representation into the final output using the loaded FLUX VAE. The PreviewImage displays a preview of the generated output, showcasing the stunning results achieved by the ComfyUI FLUX Img2Img workflow.
5.3. ComfyUI Workflow: FLUX LoRA
5.3.1. ComfyUI FLUX LoRA: Download
5.3.2. ComfyUI FLUX LoRA Online Version: ComfyUI FLUX LoRA
At RunComfy Platform, our online version preloads all the necessary modes and nodes for you. Plus, we offer high-performance GPU machines, ensuring you can enjoy the ComfyUI FLUX LoRA experience effortlessly.
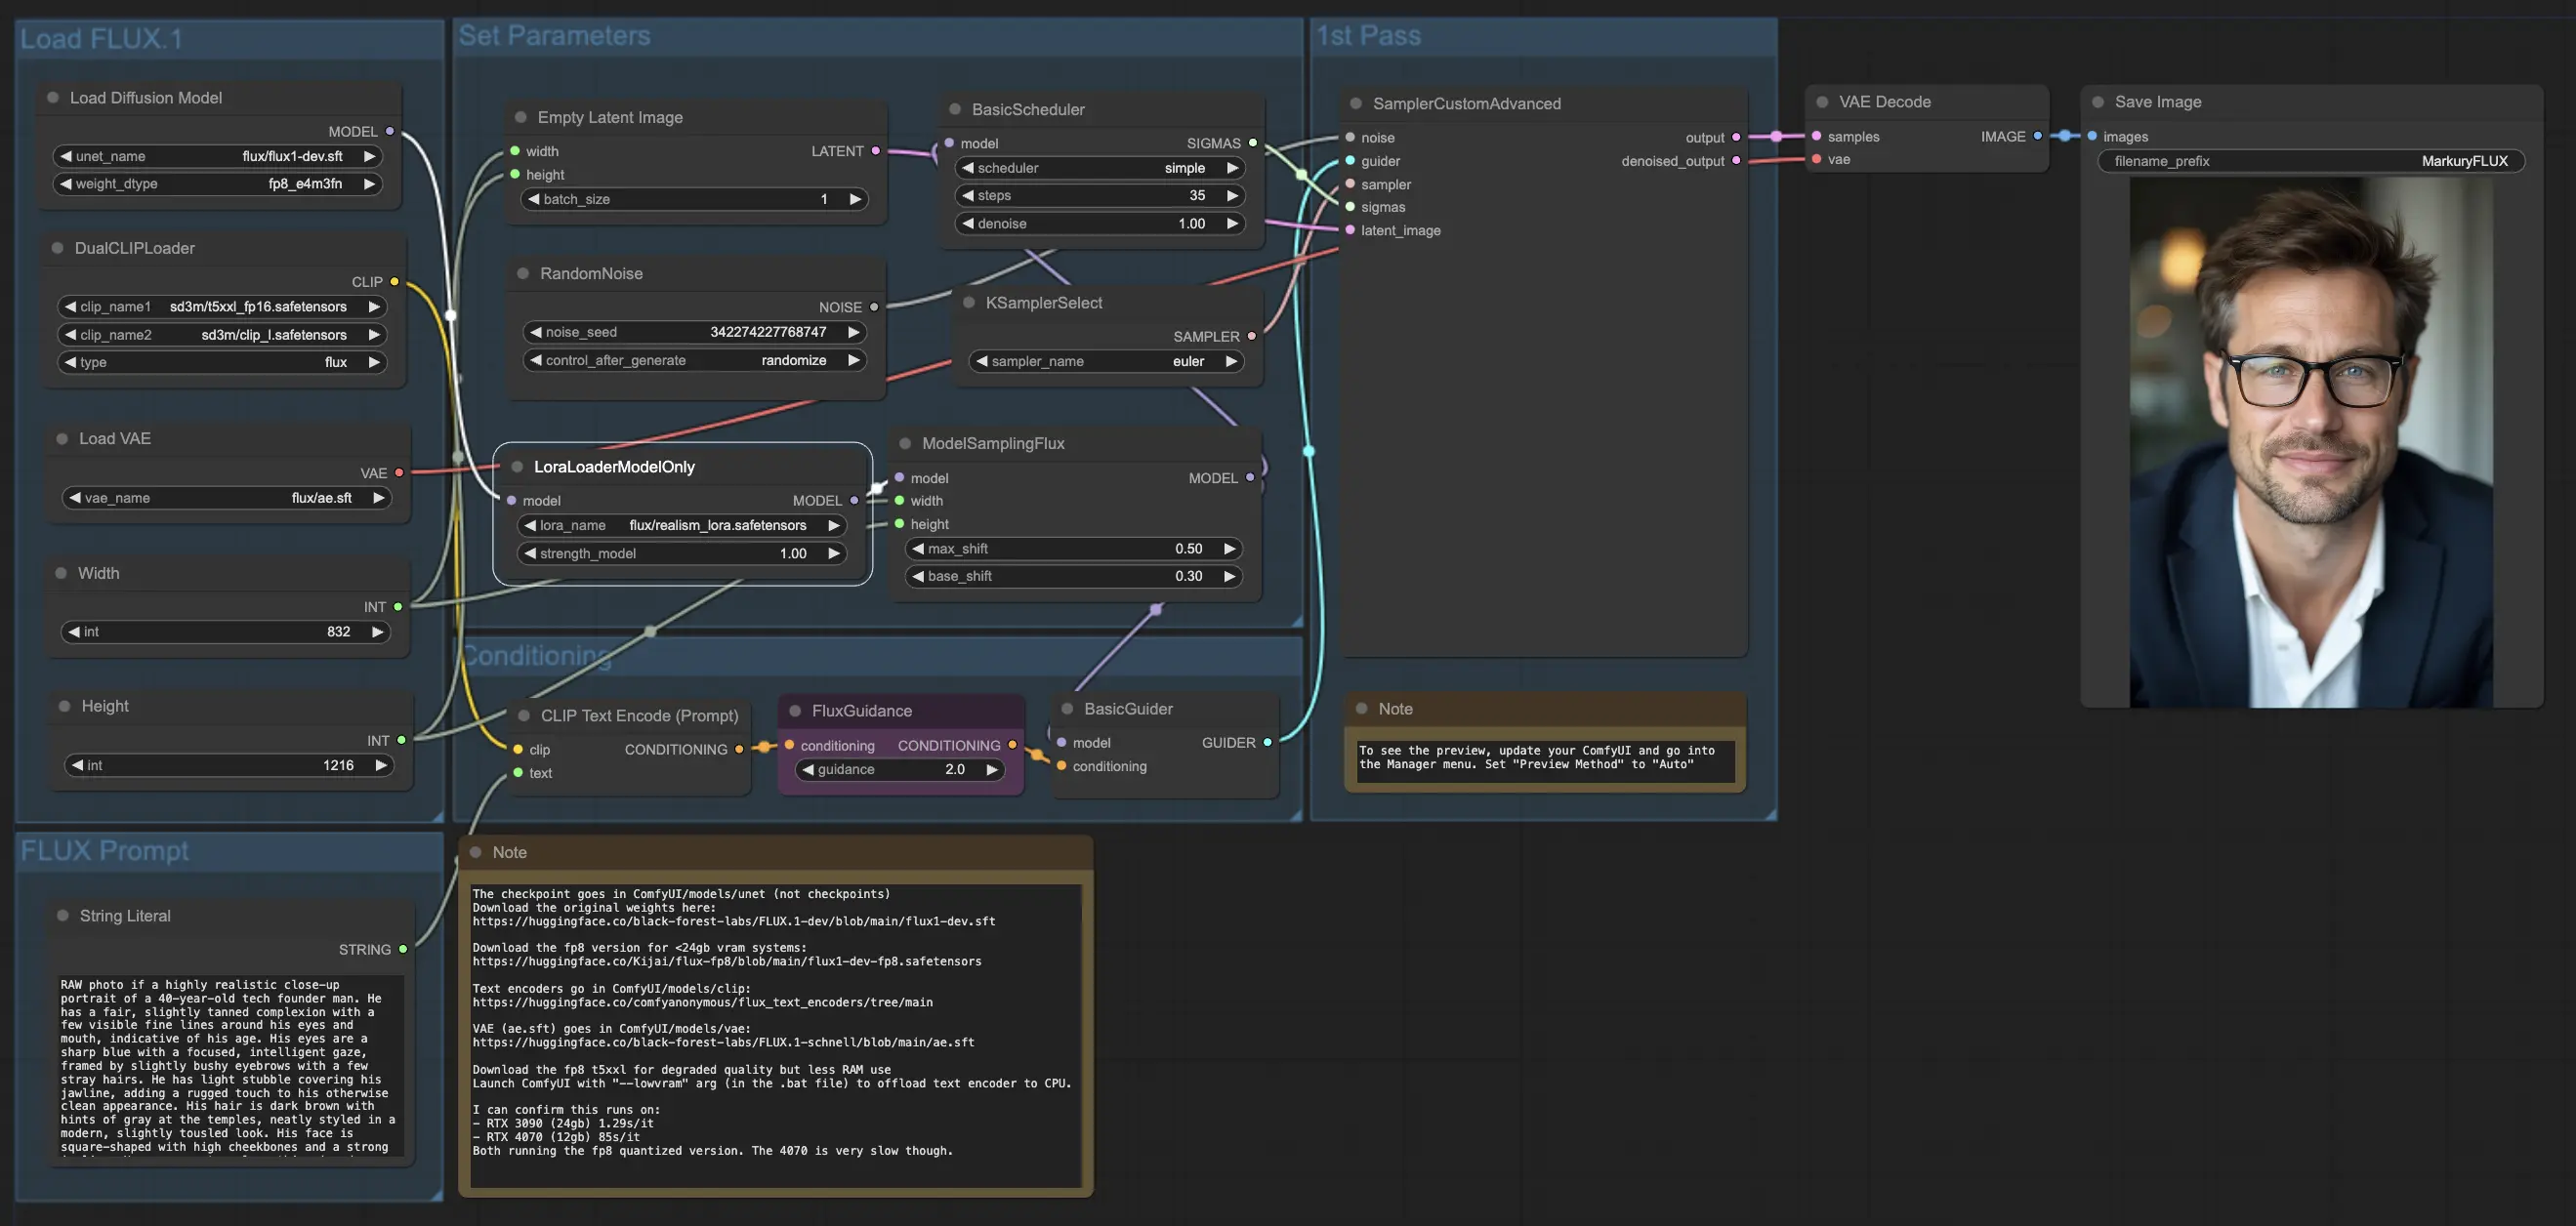
5.3.3. ComfyUI FLUX LoRA Explanation:
The ComfyUI FLUX LoRA workflow leverages the power of Low-Rank Adaptation (LoRA) to enhance the performance of ComfyUI FLUX. It starts by loading the necessary components, including the UNET model (UNETLoader), CLIP model (DualCLIPLoader), VAE model (VAELoader), and LoRA model (LoraLoaderModelOnly).
- UNETLoader: Loads the UNET model for image generation.
- Checkpoint: flux/flux1-dev.sft
- DualCLIPLoader: Loads the CLIP model for text encoding.
- Embedding Model 1: sd3m/t5xxl_fp8_e4m3fn.safetensors; sd3m/t5xxl_fp16.safetensors
- Embedding Model 2: sd3m/clip_g.safetensors; sd3m/clip_l.safetensors
- Grouping: The grouping strategy for the CLIP model is flux
- VAELoader: Loads the Variational Autoencoder (VAE) model for decoding latent representations.
- VAE model: flux/ae.sft
- LoraLoaderModelOnly: Loads the LoRA (Low-Rank Adaptation) model for enhancing the UNET model.
- LoaderModel: flux/realism_lora.safetensors
The text prompt, which describes the desired output, is specified using the String Literal. The CLIPTextEncode then encodes the text prompt, generating the encoded text conditioning that guides the ComfyUI FLUX generation process.
The FluxGuidance applies guidance to the encoded text conditioning, influencing the strength and direction of ComfyUI FLUX's adherence to the text prompt.
An empty latent representation, serving as the starting point for generation, is created using the EmptyLatentImage. The width and height of the generated output are specified using the Int Literal, ensuring the desired dimensions of the final result.
The ModelSamplingFlux sets the sampling parameters for ComfyUI FLUX, including the padding ratio and timestep respacing. These parameters control the resolution and granularity of the generated output.
The KSamplerSelect allows you to choose the sampling method for ComfyUI FLUX generation, while the BasicGuider guides the generation process based on the encoded text conditioning and the loaded FLUX UNET enhanced with FLUX LoRA.
Random noise is generated using the RandomNoise, and the BasicScheduler schedules the noise levels (sigmas) for each step in the generation process. These components introduce controlled variations and fine-tune the details in the final output.
The SamplerCustomAdvanced brings together the random noise, guider, selected sampler, scheduled sigmas, and the empty latent representation. Through an advanced sampling process, it generates a latent representation that represents the text prompt, leveraging the power of FLUX and the FLUX LoRA enhancement.
Finally, the VAEDecode decodes the generated latent representation into the final output using the loaded FLUX VAE. The SaveImage allows you to save the generated output to a specified location, preserving the stunning creation made possible by the ComfyUI FLUX LoRA workflow.
5.4. ComfyUI Workflow: FLUX ControlNet
5.4.1. ComfyUI FLUX ControlNet: Download
5.4.2. ComfyUI FLUX ControlNet Online Version: ComfyUI FLUX ControlNet
At RunComfy Platform, our online version preloads all the necessary modes and nodes for you. Plus, we offer high-performance GPU machines, ensuring you can enjoy the ComfyUI FLUX ControlNet experience effortlessly.
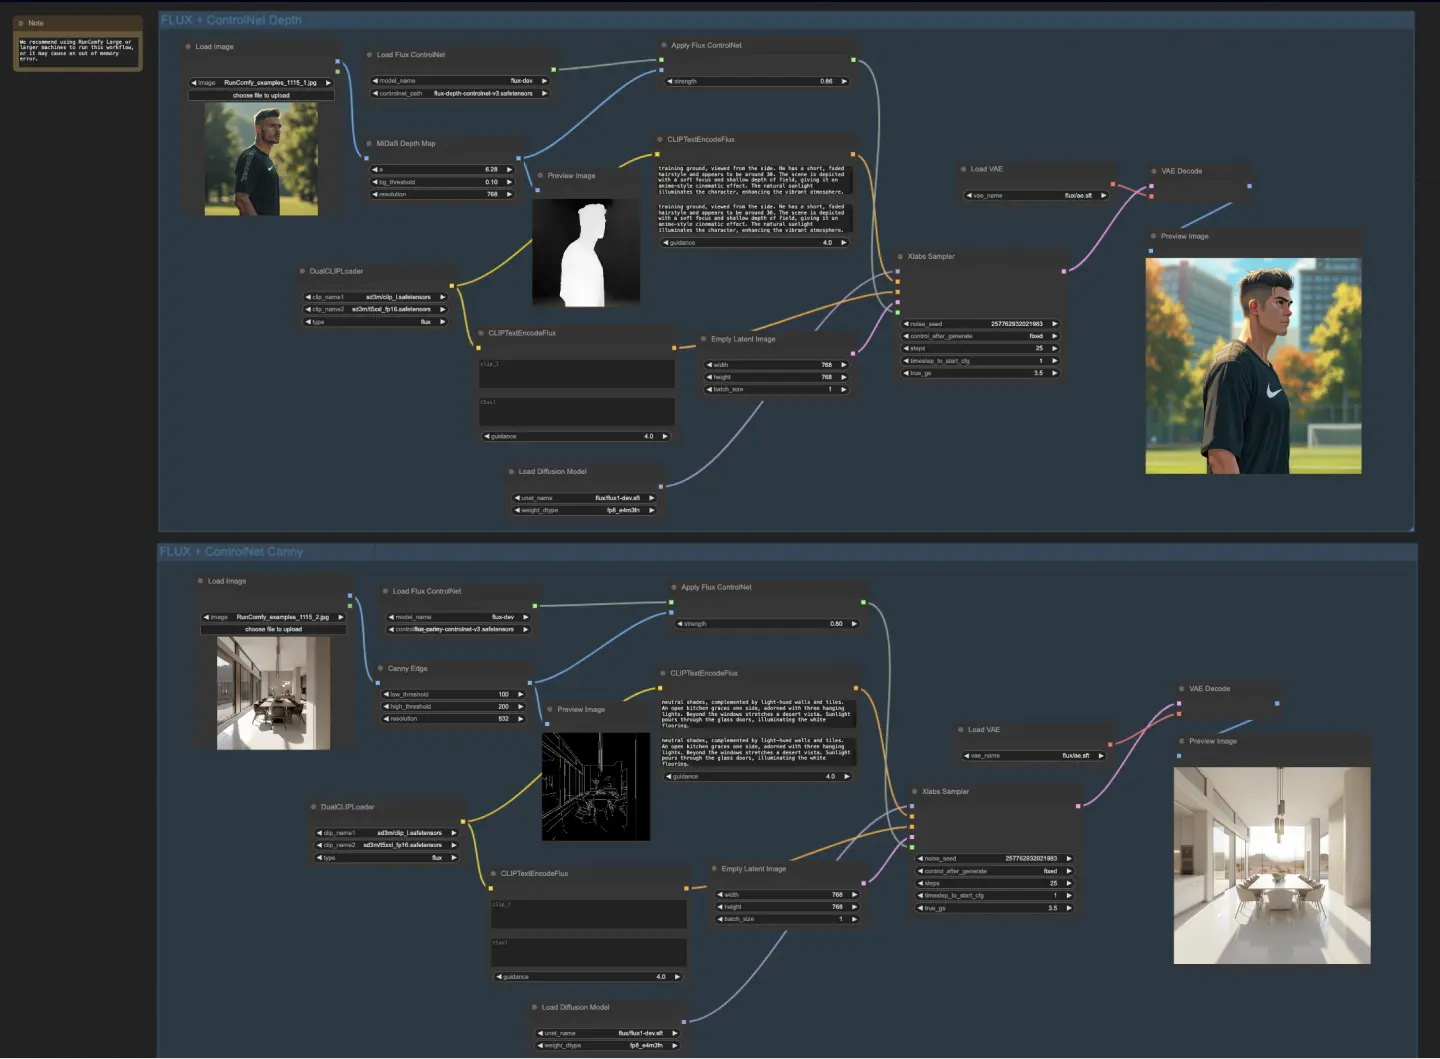
5.4.3. ComfyUI FLUX ControlNet Explanation:
The ComfyUI FLUX ControlNet workflow demonstrates the integration of ControlNet with ComfyUI FLUX for enhanced output generation. The workflow showcases two examples: depth-based conditioning and Canny edge-based conditioning.
- UNETLoader: Loads the UNET model for image generation.
- Checkpoint: flux/flux1-dev.sft
- DualCLIPLoader: Loads the CLIP model for text encoding.
- Embedding Model 1: sd3m/t5xxl_fp8_e4m3fn.safetensors; sd3m/t5xxl_fp16.safetensors
- Embedding Model 2: sd3m/clip_g.safetensors; sd3m/clip_l.safetensors
- Grouping: The grouping strategy for the CLIP model is flux
- VAELoader: Loads the Variational Autoencoder (VAE) model for decoding latent representations.
- VAE model: flux/ae.sft
In the depth-based workflow, the input representation undergoes preprocessing using the MiDaS-DepthMapPreprocessor, generating a depth map. The depth map is then passed through the ApplyFluxControlNet (Depth) along with the loaded FLUX ControlNet for depth conditioning. The resulting FLUX ControlNet condition serves as input to the XlabsSampler (Depth), along with the loaded FLUX UNET, encoded text conditioning, negative text conditioning, and empty latent representation. The XlabsSampler generates a latent representation based on these inputs, which is subsequently decoded into the final output using the VAEDecode.
- MiDaS-DepthMapPreprocessor (Depth): Preprocesses the input image for depth estimation using MiDaS.
- LoadFluxControlNet: Loads the ControlNet model.
- Path: flux-depth-controlnet.safetensors
Similarly, in the Canny edge-based workflow, the input representation undergoes preprocessing using the CannyEdgePreprocessor to generate Canny edges. The Canny edge representation is passed through the ApplyFluxControlNet (Canny) along with the loaded FLUX ControlNet for Canny edge conditioning. The resulting FLUX ControlNet condition serves as input to the XlabsSampler (Canny), along with the loaded FLUX UNET, encoded text conditioning, negative text conditioning, and empty latent representation. The XlabsSampler generates a latent representation based on these inputs, which is then decoded into the final output using the VAEDecode.
- CannyEdgePreprocessor (Canny): Preprocesses the input image for Canny edge detection.
- LoadFluxControlNet: Loads the ControlNet model.
- Path: flux-canny-controlnet.safetensors
The ComfyUI FLUX ControlNet workflow incorporates nodes for loading the necessary components (DualCLIPLoader, UNETLoader, VAELoader, LoadFluxControlNet), encoding text prompts (CLIPTextEncodeFlux), creating empty latent representations (EmptyLatentImage), and previewing the generated and preprocessed outputs (PreviewImage).
By leveraging the power of FLUX ControlNet, the ComfyUI FLUX ControlNet workflow enables the generation of outputs that align with specific conditioning, such as depth maps or Canny edges. This additional level of control and guidance enhances the flexibility and precision of the generation process, allowing for the creation of stunning and contextually relevant outputs using ComfyUI FLUX.
5.5. ComfyUI Workflow: FLUX Inpainting
5.5.1. ComfyUI FLUX Inpainting: Download
5.5.2. ComfyUI FLUX Inpainting Online Version: ComfyUI FLUX Inpainting
At RunComfy Platform, our online version preloads all the necessary modes and nodes for you. Plus, we offer high-performance GPU machines, ensuring you can enjoy the ComfyUI FLUX Inpainting experience effortlessly.
5.5.3. ComfyUI FLUX Inpainting Explanation:
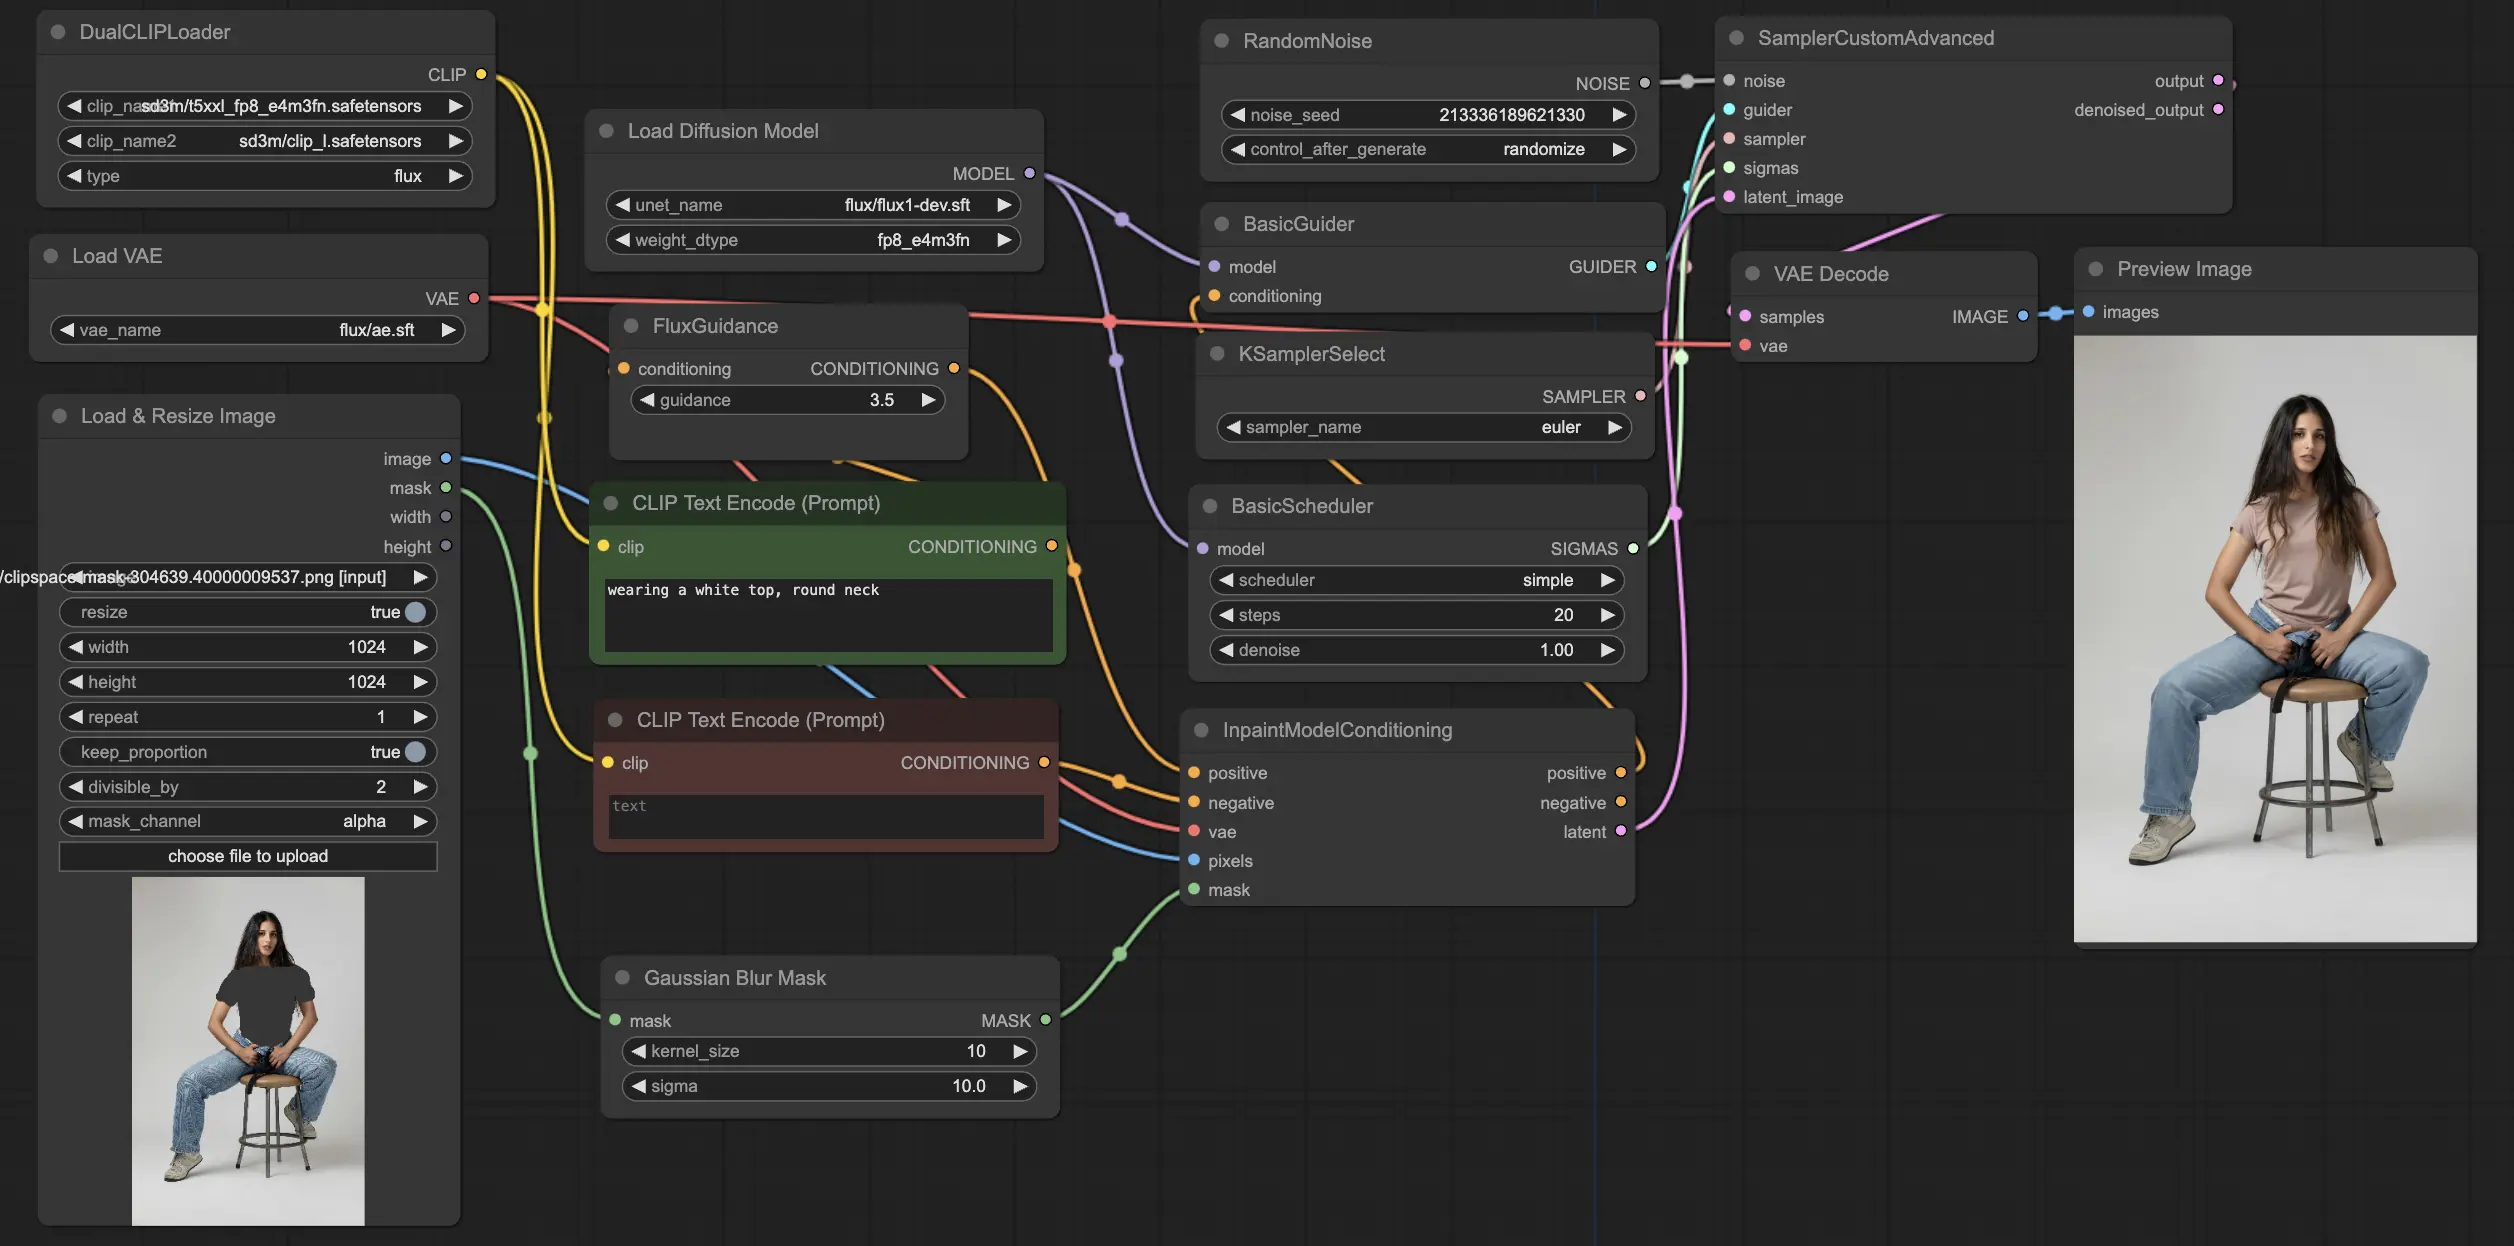
The ComfyUI FLUX Inpainting workflow demonstrates the capability of ComfyUI FLUX to perform inpainting, which involves filling in missing or masked regions of an output based on the surrounding context and provided text prompts. The workflow begins by loading the necessary components, including the UNET model (UNETLoader), VAE model (VAELoader), and CLIP model (DualCLIPLoader).
- UNETLoader: Loads the UNET model for image generation.
- Checkpoint: flux/flux1-schnell.sft; flux/flux1-dev.sft
- DualCLIPLoader: Loads the CLIP model for text encoding.
- Embedding Model 1: sd3m/t5xxl_fp8_e4m3fn.safetensors; sd3m/t5xxl_fp16.safetensors
- Embedding Model 2: sd3m/clip_g.safetensors; sd3m/clip_l.safetensors
- Grouping: The grouping strategy for the CLIP model is flux
- VAELoader: Loads the Variational Autoencoder (VAE) model for decoding latent representations.
- VAE model: flux/ae.sft
The positive and negative text prompts, which describe the desired content and style for the inpainted region, are encoded using the CLIPTextEncodes. The positive text conditioning is further guided using the FluxGuidance to influence the ComfyUI FLUX inpainting process.
The input representation and mask are loaded and resized using the LoadAndResizeImage, ensuring compatibility with ComfyUI FLUX's requirements. The ImpactGaussianBlurMask applies Gaussian blur to the mask, creating a smoother transition between the inpainted region and the original representation.
The InpaintModelConditioning prepares the conditioning for FLUX inpainting by combining the guided positive text conditioning, encoded negative text conditioning, loaded FLUX VAE, loaded and resized input representation, and blurred mask. This conditioning serves as the foundation for the ComfyUI FLUX inpainting process.
Random noise is generated using the RandomNoise, and the sampling method is selected using the KSamplerSelect. The BasicScheduler schedules the noise levels (sigmas) for the ComfyUI FLUX inpainting process, controlling the level of detail and clarity in the inpainted region.
The BasicGuider guides the ComfyUI FLUX inpainting process based on the prepared conditioning and the loaded FLUX UNET. The SamplerCustomAdvanced performs the advanced sampling process, taking the generated random noise, guider, selected sampler, scheduled sigmas, and latent representation of the input as inputs. It outputs the inpainted latent representation.
Finally, the VAEDecode decodes the inpainted latent representation into the final output, seamlessly blending the inpainted region with the original representation. The PreviewImage displays the final output, showcasing the impressive inpainting capabilities of FLUX.
By leveraging the power of FLUX and the carefully designed inpainting workflow, FLUX Inpainting enables the creation of visually coherent and contextually relevant inpainted outputs. Whether it's restoring missing parts, removing unwanted objects, or modifying specific regions, the ComfyUI FLUX inpainting workflow provides a powerful tool for editing and manipulation.
5.6. ComfyUI Workflow: FLUX NF4
5.6.1. ComfyUI FLUX NF4: Download
5.6.2. ComfyUI FLUX NF4 Online Version: ComfyUI FLUX NF4
At RunComfy Platform, our online version preloads all the necessary modes and nodes for you. Plus, we offer high-performance GPU machines, ensuring you can enjoy the ComfyUI FLUX NF4 experience effortlessly.
5.6.3. ComfyUI FLUX NF4 Explanation:
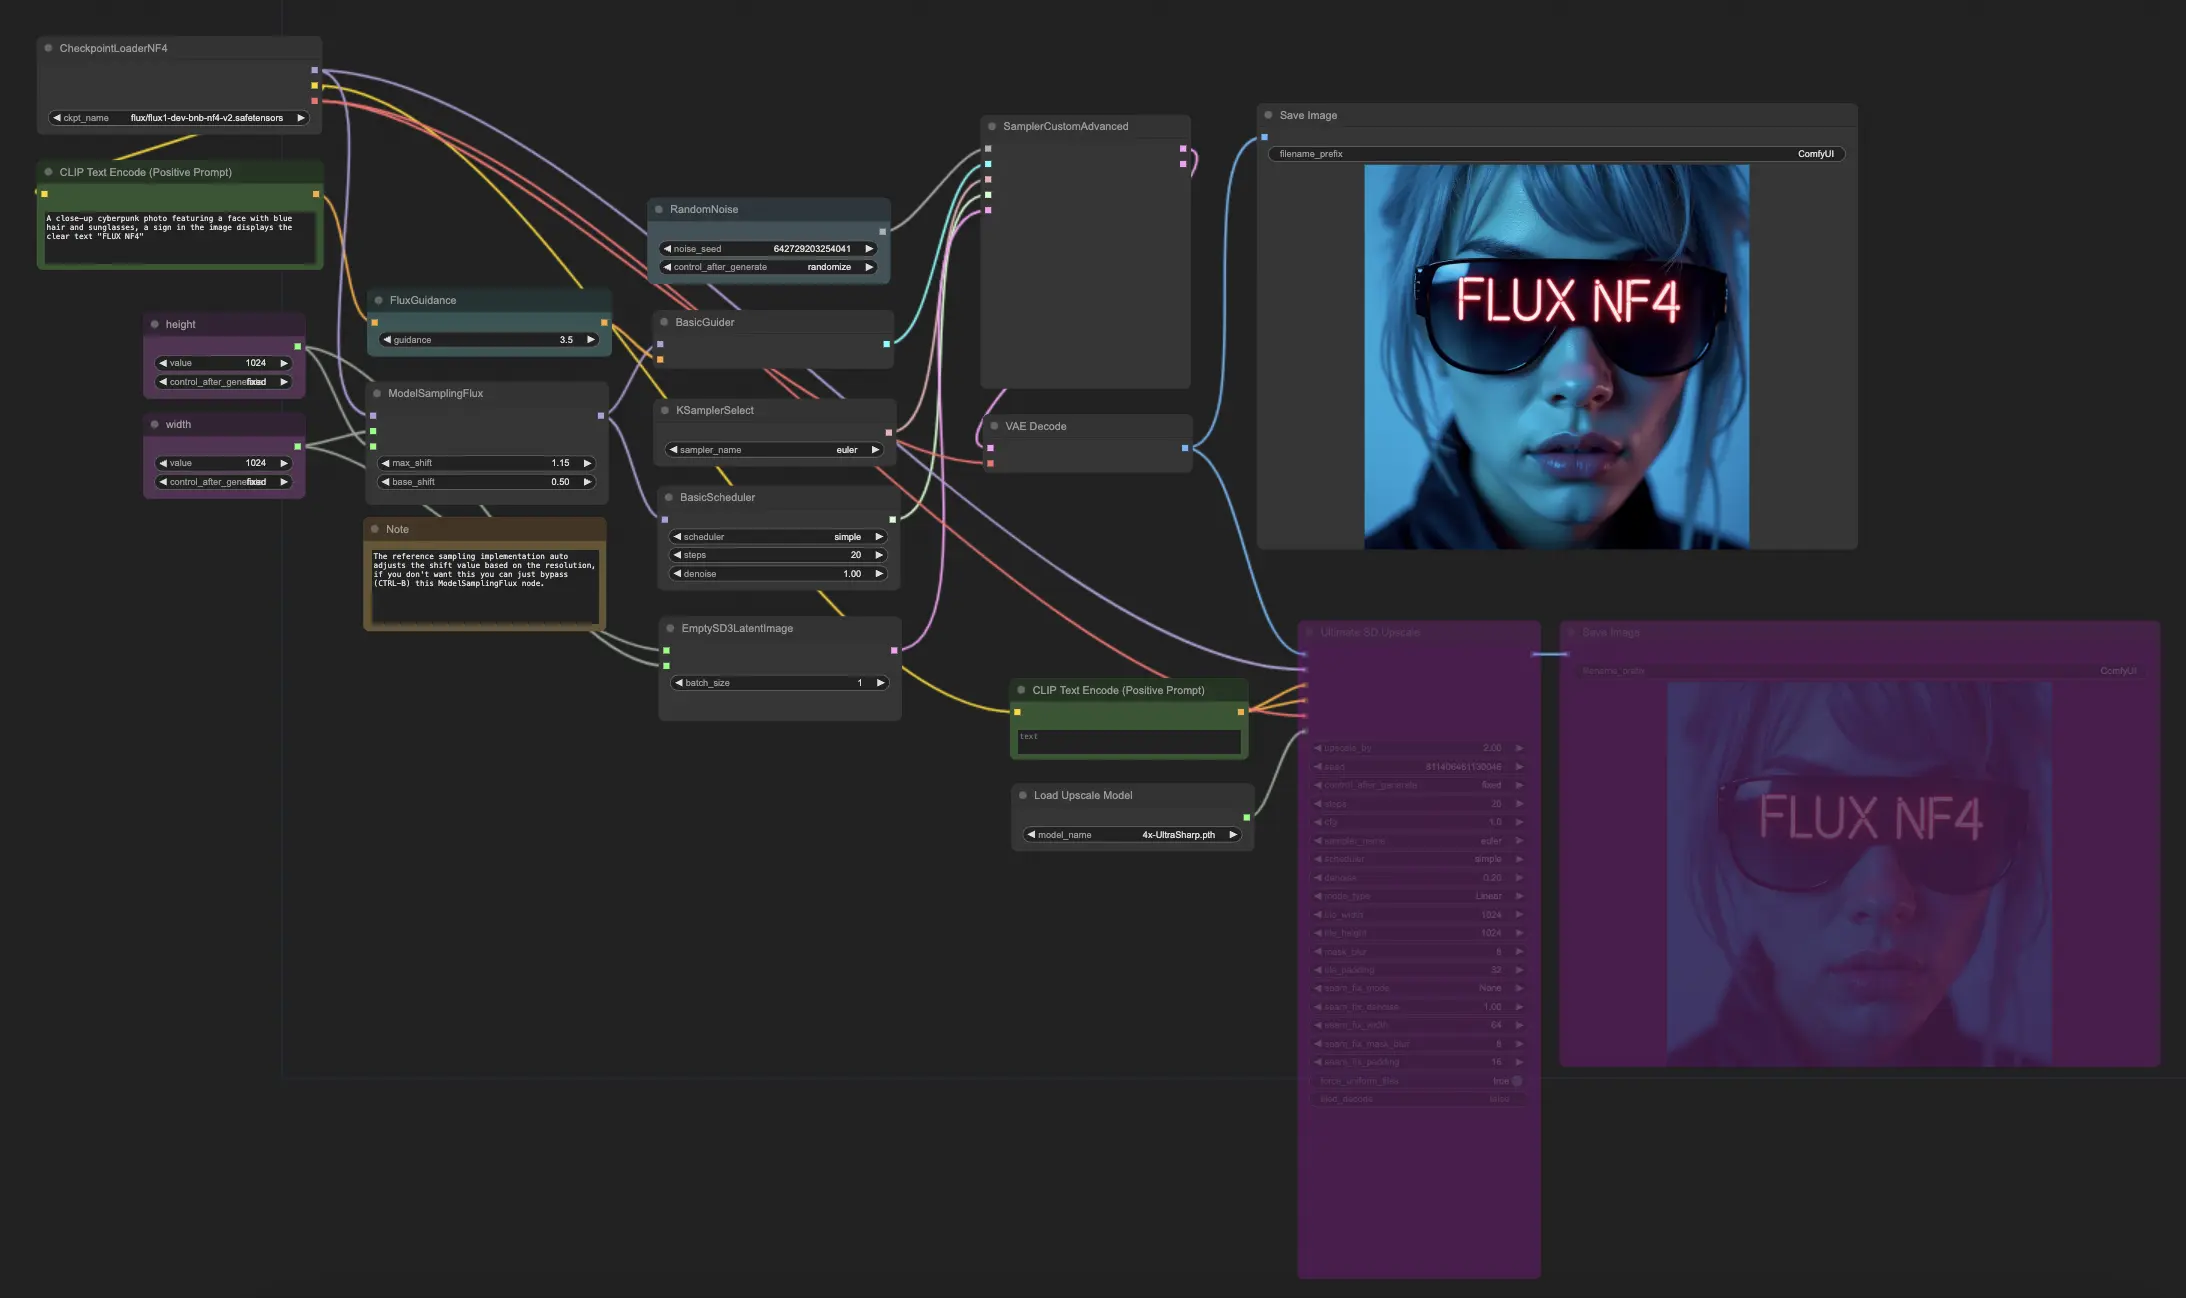
The ComfyUI FLUX NF4 workflow showcases the integration of ComfyUI FLUX with the NF4 (Normalizing Flow 4) architecture for high-quality output generation. The workflow starts by loading the necessary components using the CheckpointLoaderNF4, which includes the FLUX UNET, FLUX CLIP, and FLUX VAE.
- UNETLoader: Loads the UNET model for image generation.
- Checkpoint: TBD
The PrimitiveNode (height) and PrimitiveNode (width) nodes specify the desired height and width of the generated output. The ModelSamplingFlux node sets the sampling parameters for ComfyUI FLUX based on the loaded FLUX UNET and the specified height and width.
The EmptySD3LatentImage node creates an empty latent representation as the starting point for generation. The BasicScheduler node schedules the noise levels (sigmas) for the ComfyUI FLUX generation process.
The RandomNoise node generates random noise for the ComfyUI FLUX generation process. The BasicGuider node guides the generation process based on the conditioned ComfyUI FLUX.
The KSamplerSelect node selects the sampling method for ComfyUI FLUX generation. The SamplerCustomAdvanced node performs the advanced sampling process, taking the generated random noise, guider, selected sampler, scheduled sigmas, and empty latent representation as inputs. It outputs the generated latent representation.
The VAEDecode node decodes the generated latent representation into the final output using the loaded FLUX VAE. The SaveImage node saves the generated output to a specified location.
For upscaling, the UltimateSDUpscale node is used. It takes the generated output, loaded FLUX, positive and negative conditioning for upscaling, loaded FLUX VAE, and loaded FLUX upscaling as inputs. The CLIPTextEncode (Upscale Positive Prompt) node encodes the positive text prompt for upscaling. The UpscaleModelLoader node loads the FLUX upscaling. The UltimateSDUpscale node performs the upscaling process and outputs the upscaled representation. Finally, the SaveImage (Upscaled) node saves the upscaled output to a specified location.
By leveraging the power of ComfyUI FLUX and the NF4 architecture, the ComfyUI FLUX NF4 workflow enables the generation of high-quality outputs with enhanced fidelity and realism. The seamless integration of ComfyUI FLUX with the NF4 architecture provides a powerful tool for creating stunning and captivating outputs.
5.7. ComfyUI Workflow: FLUX IPAdapter
5.7.1. ComfyUI FLUX IPAdapter: Download
5.7.2. ComfyUI FLUX IPAdapter Online Version: ComfyUI FLUX IPAdapter
At RunComfy Platform, our online version preloads all the necessary modes and nodes for you. Plus, we offer high-performance GPU machines, ensuring you can enjoy the ComfyUI FLUX IPAdapter experience effortlessly.
5.7.3. ComfyUI FLUX IPAdapter Explanation:
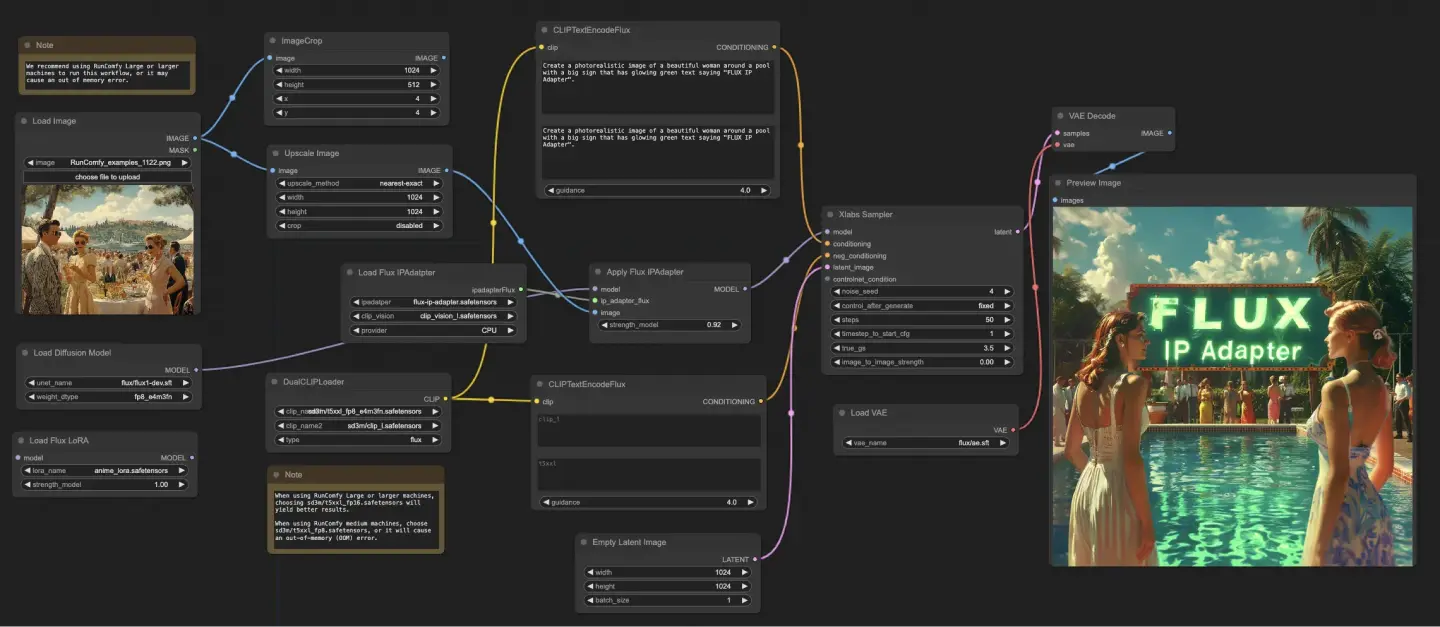
The ComfyUI FLUX IPAdapter workflow starts by loading the necessary models, including the UNET model (UNETLoader), CLIP model (DualCLIPLoader), and VAE model (VAELoader).
The positive and negative text prompts are encoded using the CLIPTextEncodeFlux. The positive text conditioning is used to guide the ComfyUI FLUX generation process.
The input image is loaded using the LoadImage. The LoadFluxIPAdapter loads the IP-Adapter for the FLUX model, which is then applied to the loaded UNET model using the ApplyFluxIPAdapter. The ImageScale scales the input image to the desired size before applying the IP-Adapter.
- LoadFluxIPAdapter: Loads the IP-Adapter for the FLUX model.
- IP Adapter Model: flux-ip-adapter.safetensors
- CLIP Vision Encoder: clip_vision_l.safetensors
The EmptyLatentImage creates an empty latent representation as the starting point for ComfyUI FLUX generation.
The XlabsSampler performs the sampling process, taking the FLUX UNET with applied IP-Adapter, encoded positive and negative text conditioning, and empty latent representation as inputs. It generates a latent representation.
The VAEDecode decodes the generated latent representation into the final output using the loaded FLUX VAE. The PreviewImage node displays a preview of the final output.
The ComfyUI FLUX IPAdapter workflow leverages the power of ComfyUI FLUX and the IP-Adapter to generate high-quality outputs that align with the provided text prompts. By applying the IP-Adapter to the FLUX UNET, the workflow enables the generation of outputs that capture the desired characteristics and style specified in the text conditioning.
5.8. ComfyUI Workflow: Flux LoRA Trainer

5.8.1. ComfyUI FLUX LoRA Trainer: Download
5.8.2. ComfyUI Flux LoRA Trainer Explanation:
The ComfyUI FLUX LoRA Trainer workflow consists of multiple stages for training a LoRA using the FLUX architecture in ComfyUI.
ComfyUI FLUX Selection and Configuration: The FluxTrainModelSelect node is used to select the components for training, including the UNET, VAE, CLIP, and CLIP text encoder. The OptimizerConfig node configures the optimizer settings for ComfyUI FLUX training, such as the optimizer type, learning rate, and weight decay. The TrainDatasetGeneralConfig and TrainDatasetAdd nodes are used to configure the training dataset, including the resolution, augmentation settings, and batch sizes.
ComfyUI FLUX Training Initialization: The InitFluxLoRATraining node initializes the LoRA training process using the selected components, dataset configuration, and optimizer settings. The FluxTrainValidationSettings node configures the validation settings for training, such as the number of validation samples, resolution, and batch size.
ComfyUI FLUX Training Loop: The FluxTrainLoop node performs the training loop for the LoRA, iterating for a specified number of steps. After each training loop, the FluxTrainValidate node validates the trained LoRA using the validation settings and generates validation outputs. The PreviewImage node displays a preview of the validation results. The FluxTrainSave node saves the trained LoRA at specified intervals.
ComfyUI FLUX Loss Visualization: The VisualizeLoss node visualizes the training loss over the course of training. The SaveImage node saves the loss plot for further analysis.
ComfyUI FLUX Validation Output Processing: The AddLabel and SomethingToString nodes are used to add labels to the validation outputs, indicating the training steps. The ImageBatchMulti and ImageConcatFromBatch nodes combine and concatenate the validation outputs into a single result for easier visualization.
ComfyUI FLUX Training Finalization: The FluxTrainEnd node finalizes the LoRA training process and saves the trained LoRA. The UploadToHuggingFace node can be used to upload the trained LoRA to Hugging Face for sharing and further use with ComfyUI FLUX.
5.9. ComfyUI Workflow: Flux Latent Upscaler
5.9.1. ComfyUI Flux Latent Upscaler: Download
5.9.2. ComfyUI Flux Latent Upscaler Explanation:
The ComfyUI Flux Latent Upscale workflow starts by loading the necessary components, including the CLIP (DualCLIPLoader), UNET (UNETLoader), and VAE (VAELoader). The text prompt is encoded using the CLIPTextEncode node, and guidance is applied using the FluxGuidance node.
The SDXLEmptyLatentSizePicker+ node specifies the size of the empty latent representation, which serves as the starting point for the upscaling process in FLUX. The latent representation is then processed through a series of upscaling and cropping steps using the LatentUpscale and LatentCrop nodes.
The upscaling process is guided by the encoded text conditioning and uses the SamplerCustomAdvanced node with the selected sampling method (KSamplerSelect) and scheduled noise levels (BasicScheduler). The ModelSamplingFlux node sets the sampling parameters.
The upscaled latent representation is then composited with the original latent representation using the LatentCompositeMasked node and a mask generated by the SolidMask and FeatherMask nodes. Noise is injected into the upscaled latent representation using the InjectLatentNoise+ node.
Finally, the upscaled latent representation is decoded into the final output using the VAEDecode node, and smart sharpening is applied using the ImageSmartSharpen+ node. The PreviewImage node displays a preview of the final output generated by ComfyUI FLUX.
The ComfyUI FLUX Latent Upscaler workflow also includes various mathematical operations using the SimpleMath+, SimpleMathFloat+, SimpleMathInt+, and SimpleMathPercent+ nodes to calculate dimensions, ratios, and other parameters for the upscaling process.