FLUX LoRA has gained immense popularity in the AI community, particularly among those seeking to fine-tune AI models with their own datasets. This approach allows you to effortlessly adapt pre-existing FLUX models to your unique datasets, making it highly customizable and efficient for a wide range of creative endeavors. If you're already familiar with ComfyUI, using the ComfyUI FLUX LoRA Training workflow to train your FLUX LoRA model will be a breeze. The workflow and related nodes were created by Kijai, so big thanks to him for his contribution! Check out Kijai's GitHub for more info.
Note: For a more streamlined, GUI-based training experience without managing complex node graphs, you can also use our dedicated RunComfy AI Toolkit.
ComfyUI FLUX LoRA Training Tutorial
The ComfyUI FLUX LoRA Training workflow is a powerful process designed for training FLUX LoRA models. Training with ComfyUI offers several advantages, particularly for users already familiar with its interface. With FLUX LoRA Training, you can use the same models employed for inference, ensuring there are no compatibility issues when working within the same Python environment. Additionally, you can build workflows to compare different settings, enhancing your training process. This tutorial will guide you through the steps to set up and use FLUX LoRA Training in ComfyUI.
We will cover:
- Preparing Your Dataset for FLUX LoRA Training
- The FLUX LoRA Training Process
- Executing FLUX LoRA Training
- How and Where to Use the FLUX and FLUX LoRA Models
1. Preparing Your Dataset for FLUX LoRA Training
When preparing your training data for FLUX LoRA Training, it's essential to have high-quality images for your target subject.
In this example, we're training a FLUX LoRA model to generate images of a specific influencer. For this, you'll need a set of high-quality images of the influencer in various poses and settings. A convenient way to gather these images is by using the ComfyUI Consistent Character workflow, which makes it easy to generate a collection of images that show the same character in different poses while keeping their appearance consistent. For our training dataset, we've selected five high-quality images of the influencer in various poses and settings, ensuring the dataset is robust enough for FLUX LoRA Training to learn the intricate details needed to produce consistent and accurate outputs.
Process for Obtaining Training Data
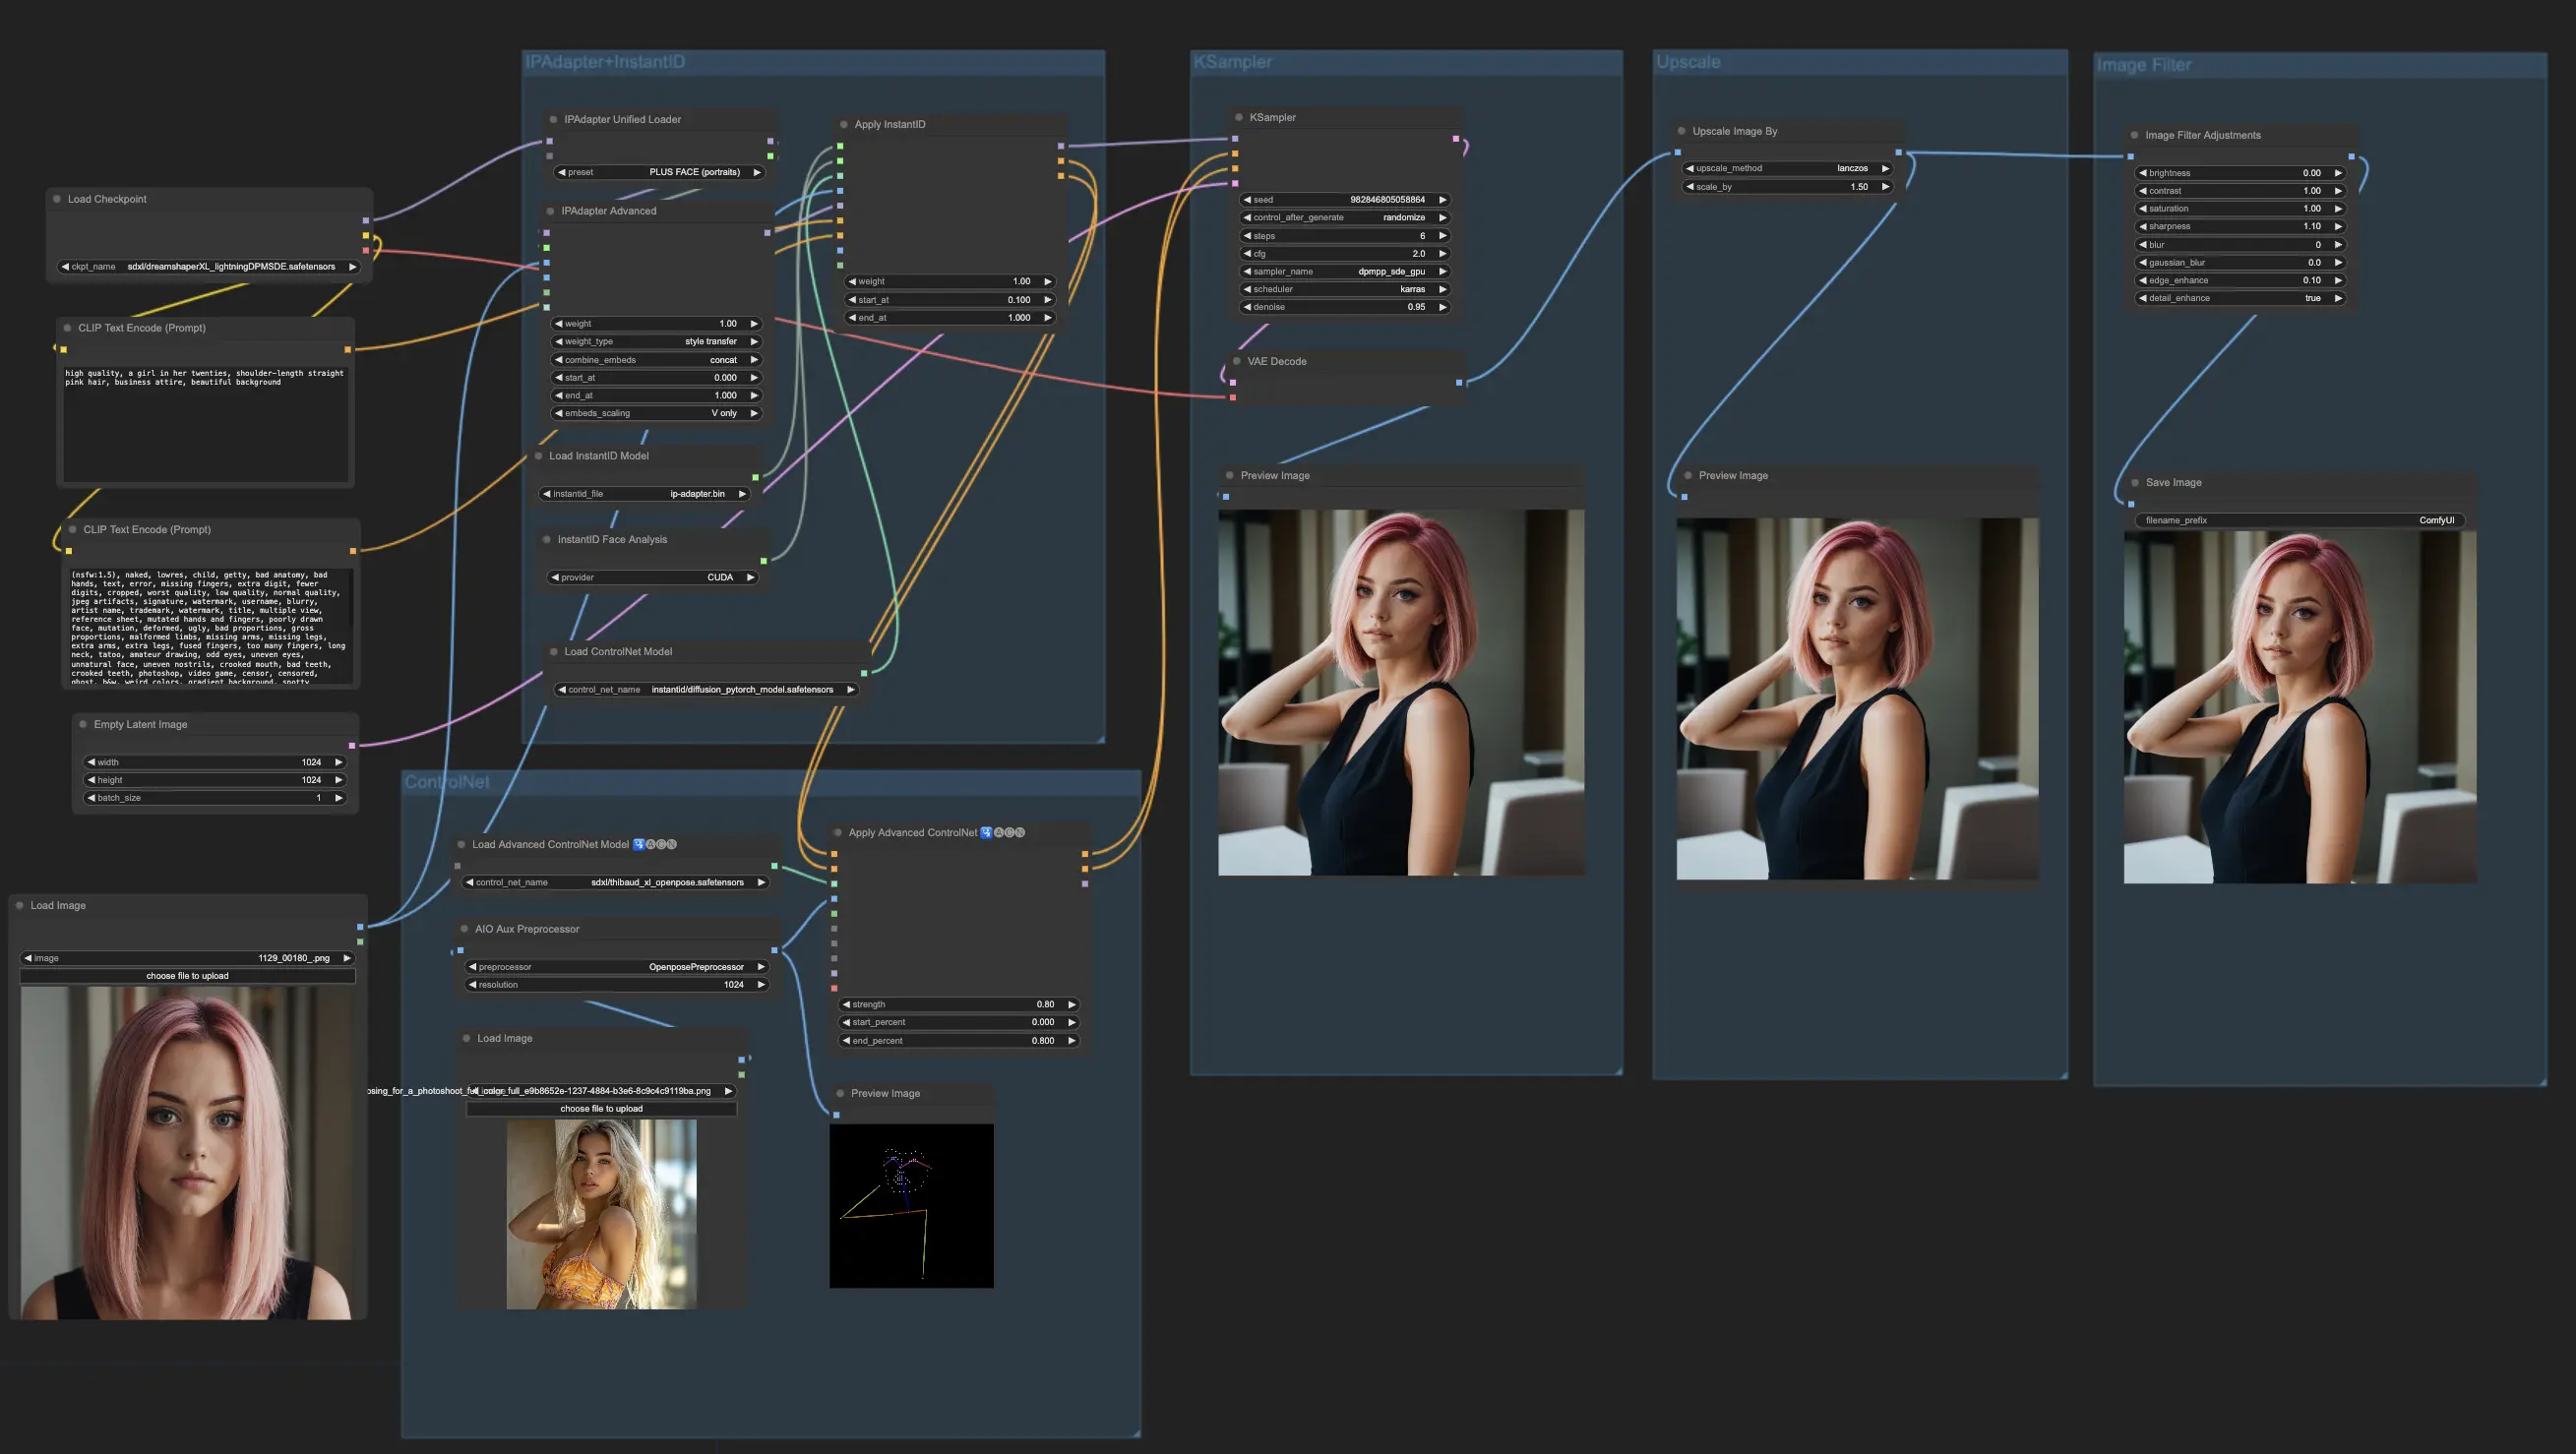
Training Data Example

You can also collect your own dataset based on your specific needs——FLUX LoRA Training is flexible and works with various types of data.
2. The FLUX LoRA Training Process
The FLUX LoRA Training workflow consists of several key nodes that work together to train and validate your model. Here's a detailed overview of the main nodes, separated into three parts: Dataset, Settings and Init, and Training.
2.1. Set Datasets for FLUX LoRA Training
The Dataset section consists of two essential nodes that help you configure and customize your training data: TrainDatasetGeneralConfig and TrainDatasetAdd.
2.1.1. TrainDatasetGeneralConfig
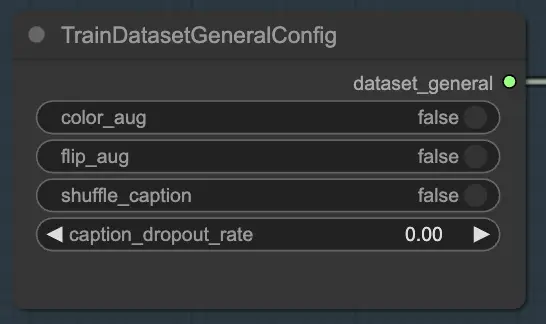
The TrainDatasetGeneralConfig node is where you define the overall settings for your training dataset in FLUX LoRA Training. This node gives you control over various aspects of data augmentation and preprocessing. For instance, you can choose to enable or disable color augmentation, which can help improve the model's ability to generalize across different color variations. Similarly, you can toggle flip augmentation to randomly flip images horizontally, providing more diverse training samples. Additionally, you have the option to shuffle the captions associated with each image, introducing randomness and reducing overfitting. The caption dropout rate allows you to randomly drop captions during training, which can help the model become more robust to missing or incomplete captions.
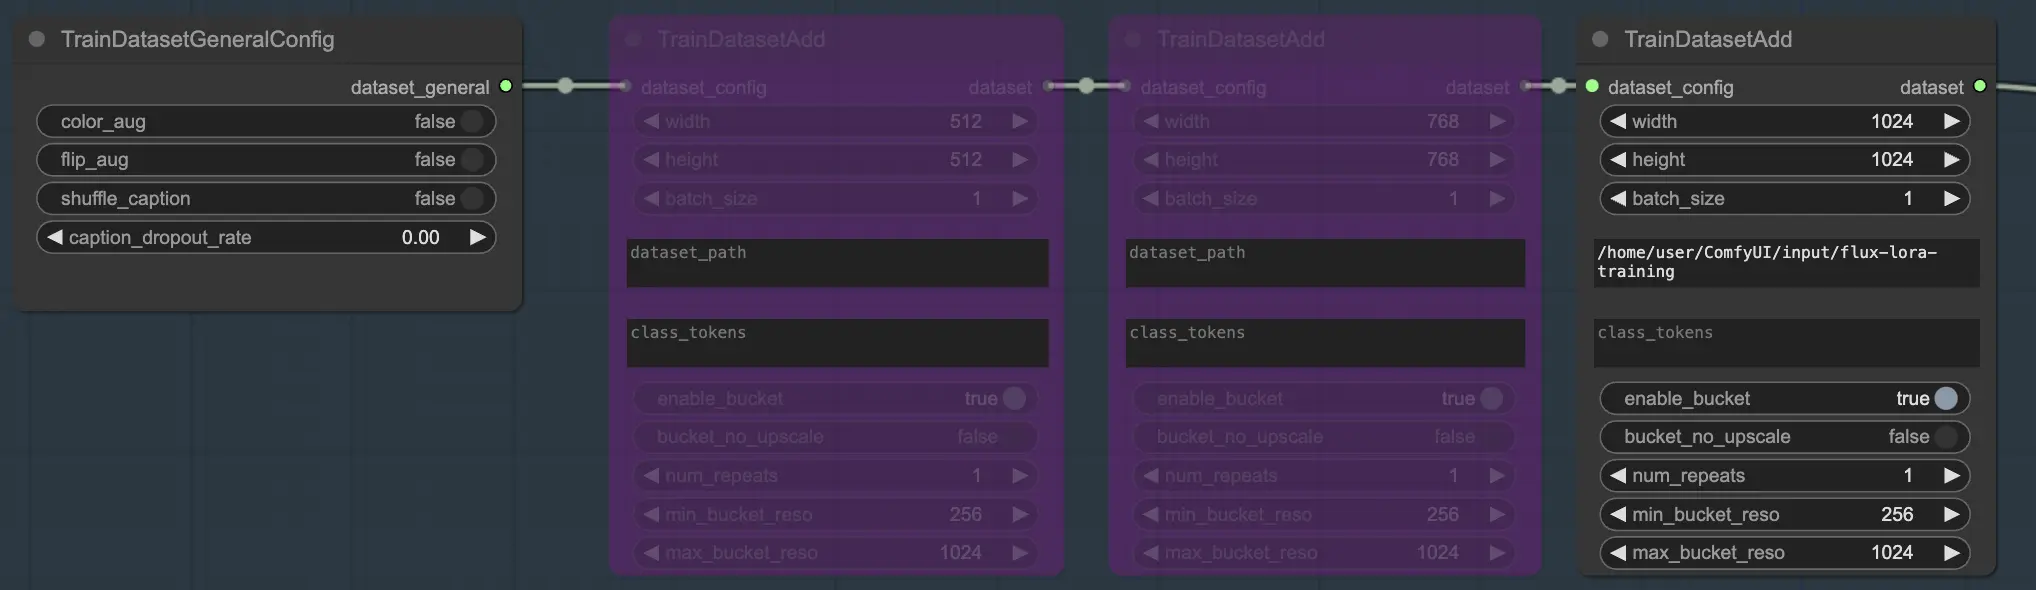
2.1.2. TrainDatasetAdd
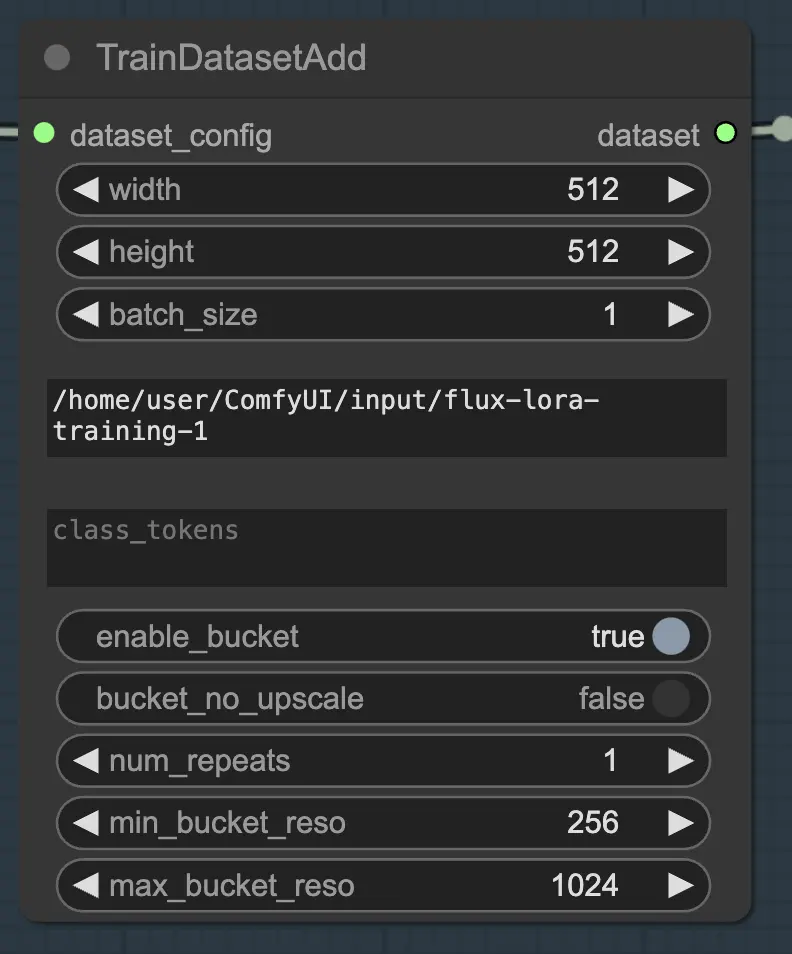
The TrainDatasetAdd node is where you specify the details of each individual dataset to include in your FLUX LoRA Training.
Input directory: Train Dataset Path
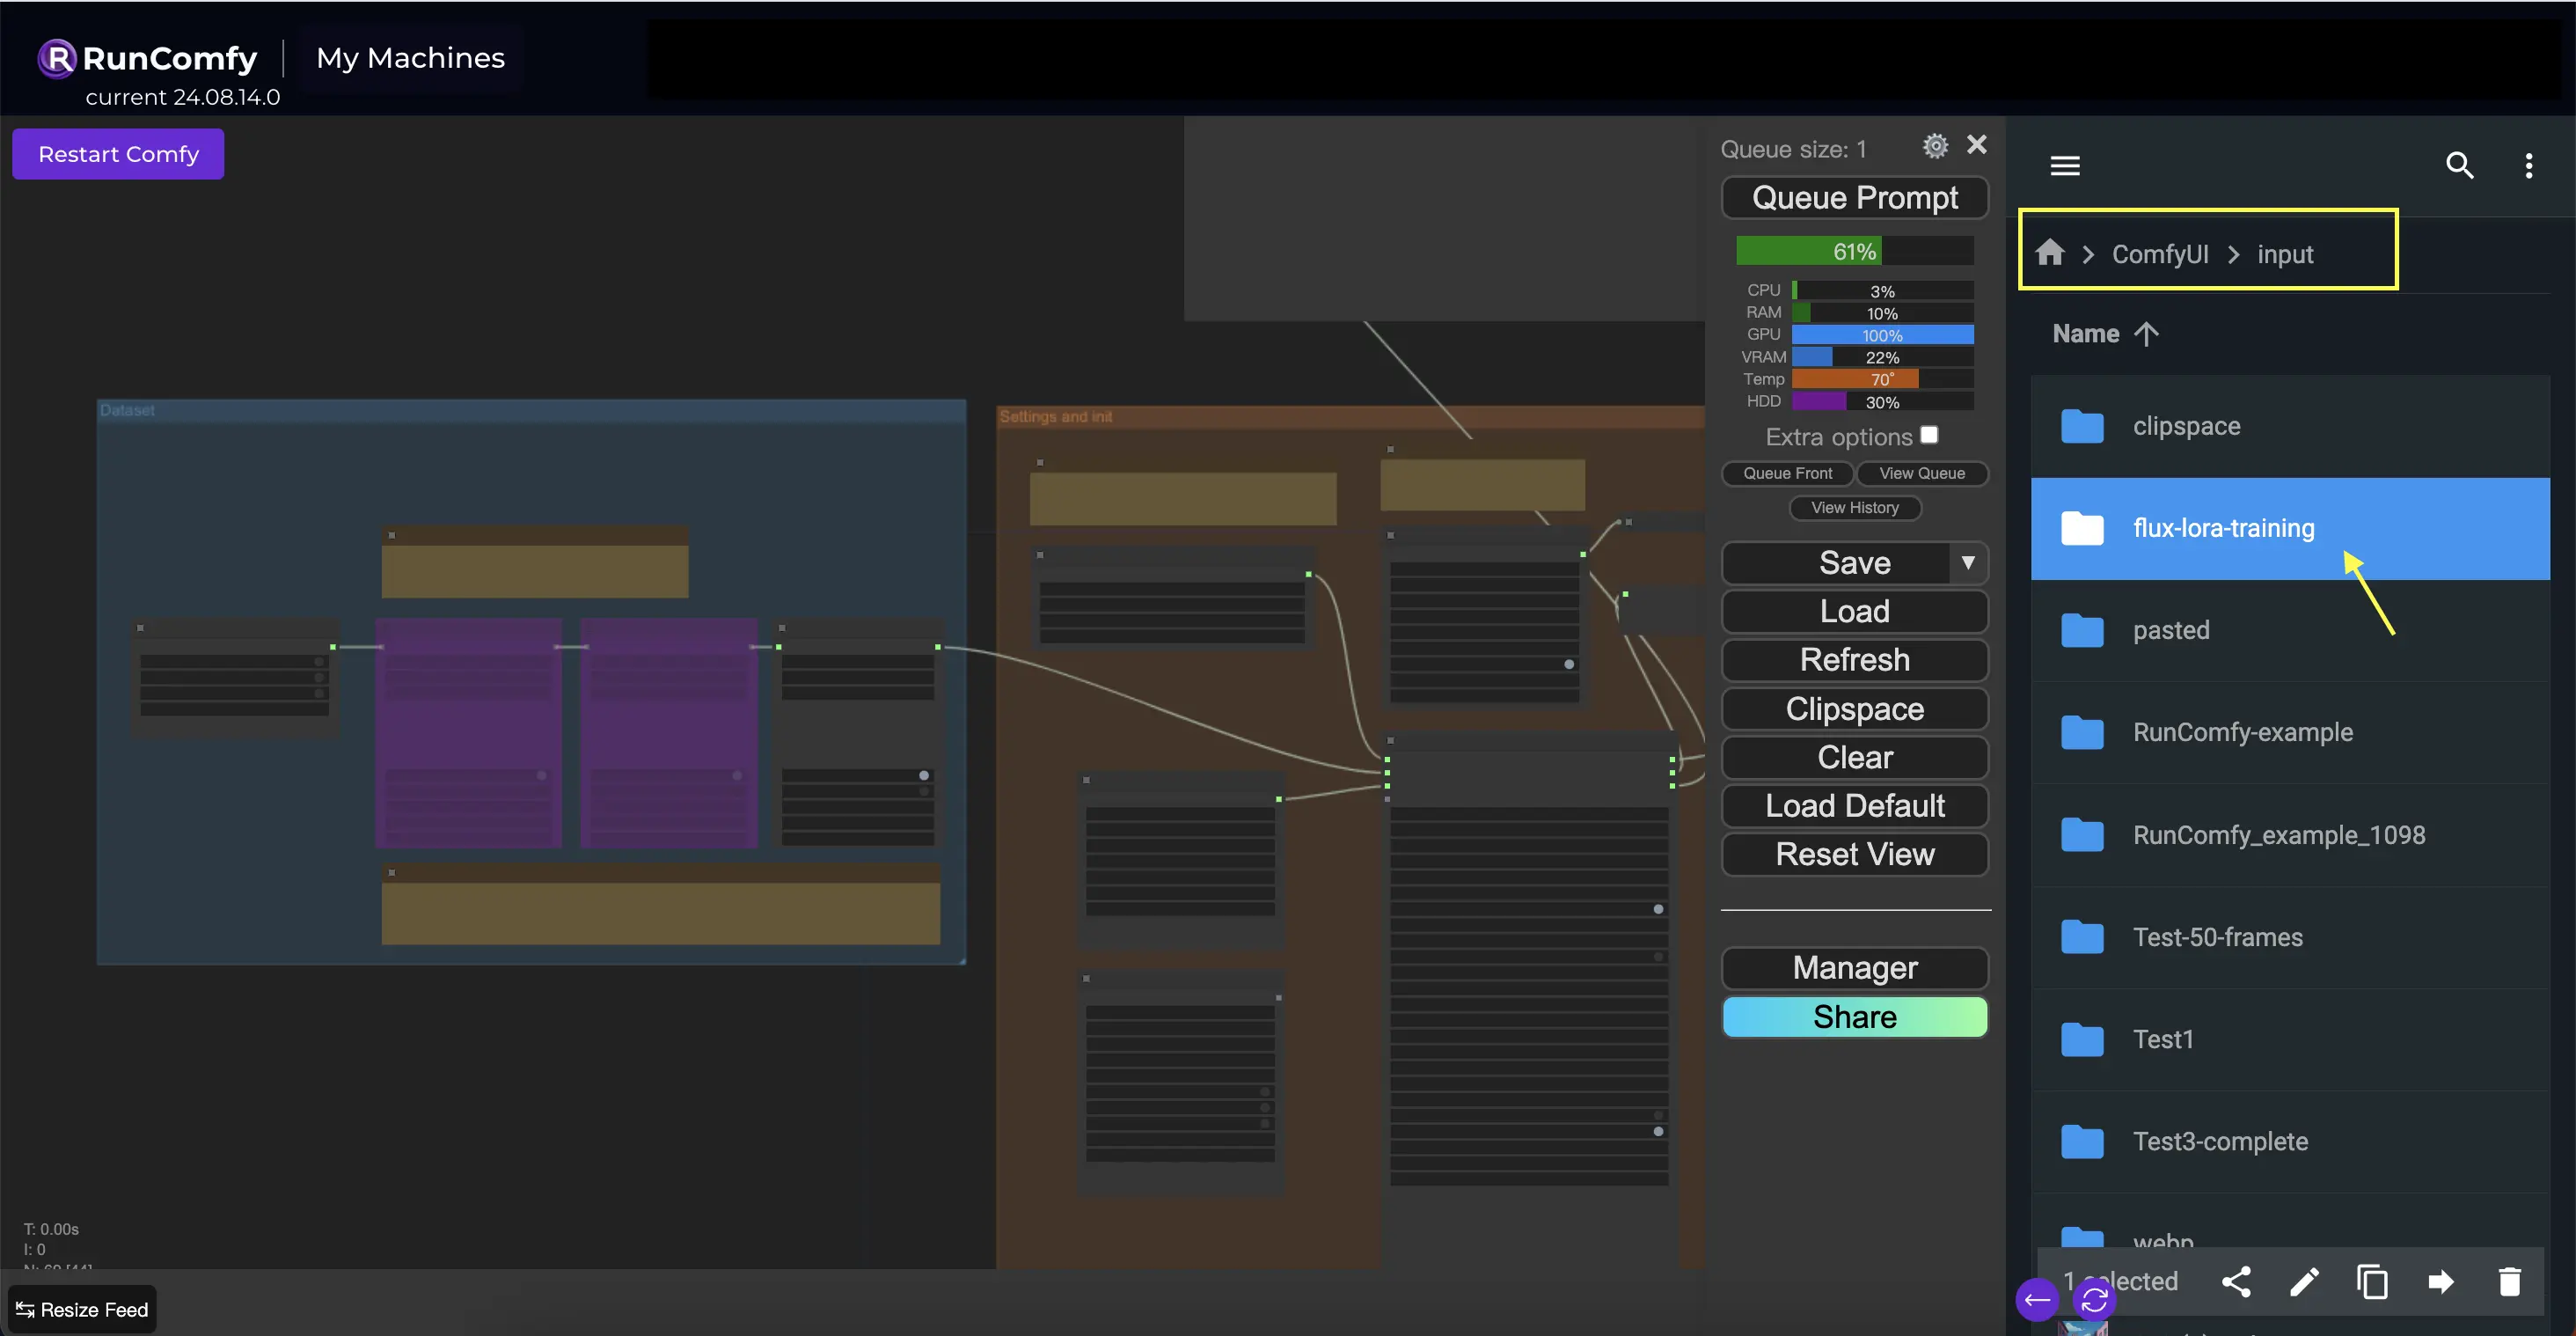
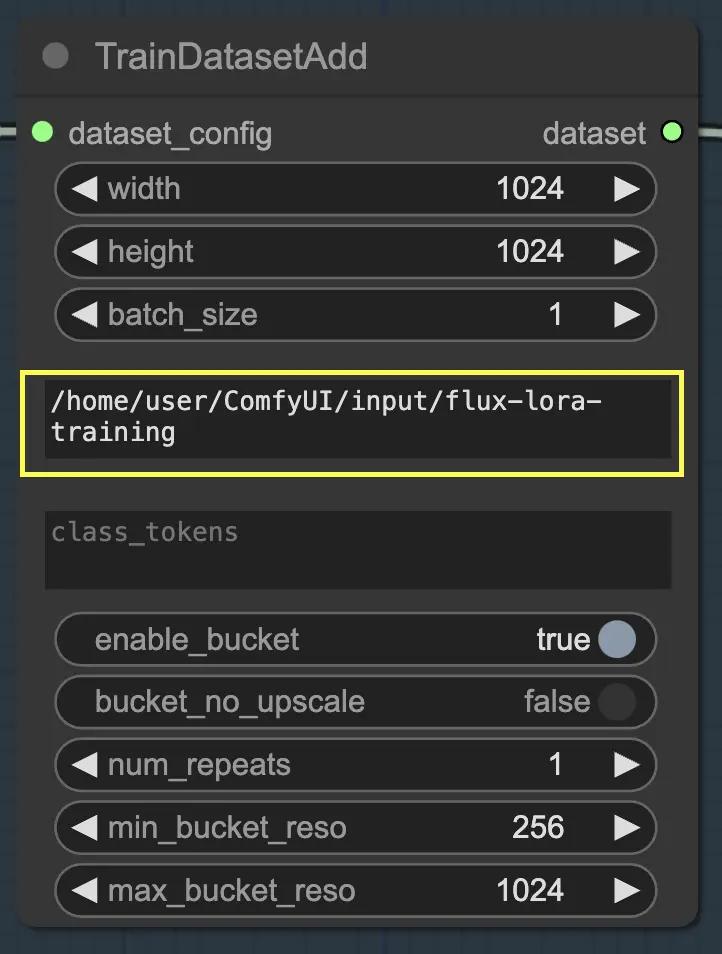
To make the most of this node, it's important to organize your training data properly. When using RunComfy’s file browser, place the training data in the /home/user/ComfyUI/input/{file-name} directory, where {file-name} is a meaningful name you assign to your dataset.
Once you've placed your training data in the appropriate directory, you need to provide the path to that directory in the image_dir parameter of the TrainDatasetAdd node. This tells the node where to find your training images.
Class Token
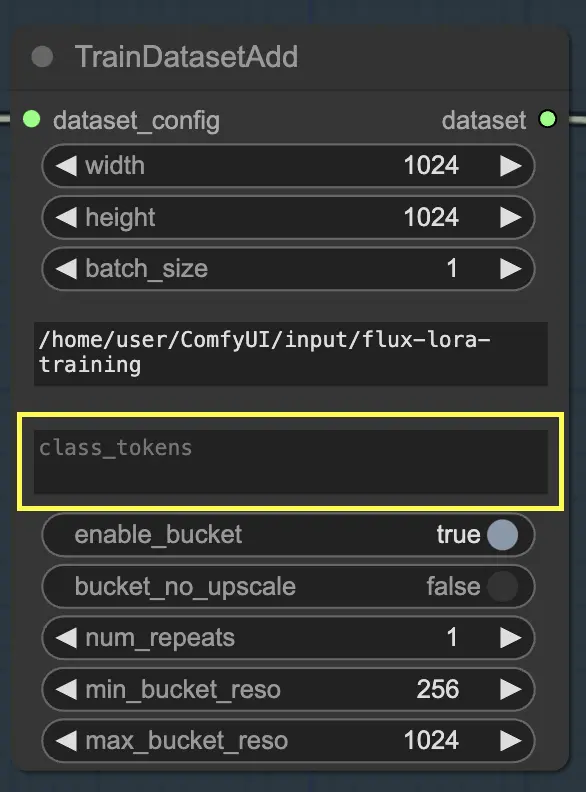
If your dataset benefits from using specific class tokens or trigger words, you can enter them in the class_tokens parameter. Class tokens are special words or phrases that are prepended to each caption and help guide the model's generation process. For instance, if you're training on a dataset of various animal species, you could use class tokens like "dog", "cat", or "bird" to indicate the desired animal in the generated images. When you later use these class tokens in your prompts, you can control which specific aspects you want the model to generate.
Set the resolution (width and height), batch size
In addition to the image_dir and class_tokens parameters, the TrainDatasetAdd node provides several other options to fine-tune your dataset. You can set the resolution (width and height) of the images, specify the batch size for training, and determine the number of times the dataset should be repeated per epoch.
Multiple datasets
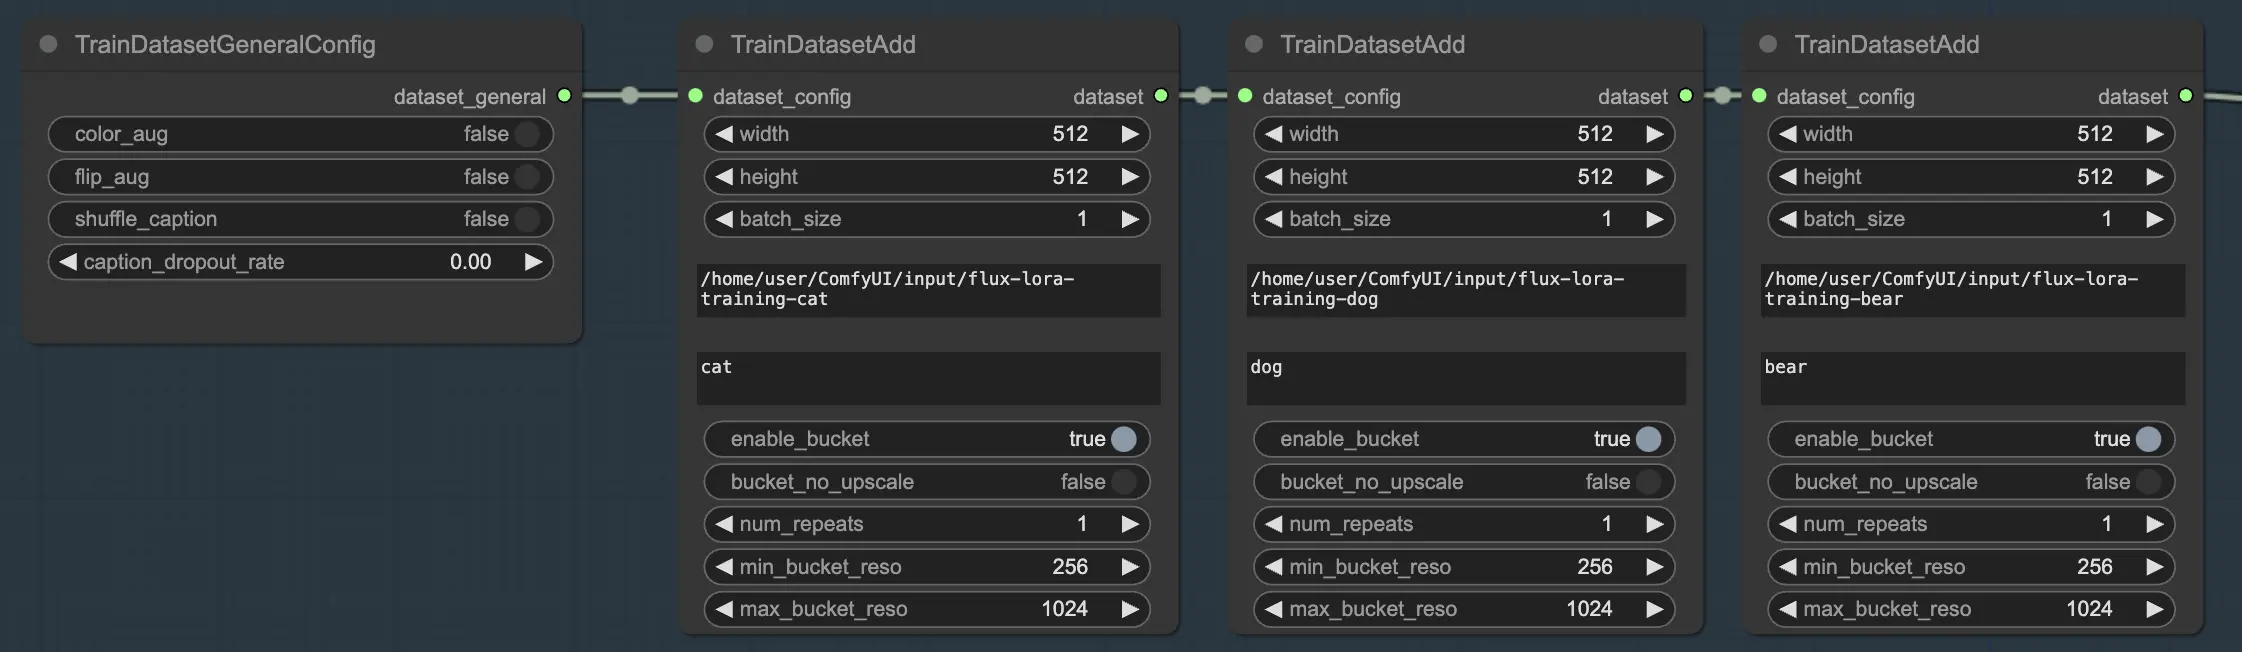
One of the powerful features of FLUX LoRA Training is the ability to combine multiple datasets seamlessly. In the FLUX LoRA Training workflow, there are three TrainDatasetAdd nodes connected in sequence. Each node represents a distinct dataset with its own unique settings. By linking these nodes together, you can create a rich and diverse training set that incorporates images and captions from various sources.
To illustrate this, let's consider a scenario where you have three separate datasets: one for cats, one for dogs, and another for bears. You can set up three TrainDatasetAdd nodes, each dedicated to one of these datasets. In the first node, you would specify the path to the "cats" dataset in the image_dir parameter, set the class token to "cat," and adjust other parameters like resolution and batch size to suit your needs. Similarly, you would configure the second and third nodes for the "dogs" and "bears" datasets, respectively.
This approach allows the FLUX LoRA Training process to leverage a diverse range of images, improving the model’s ability to generalize across different categories.
Example
In our example, we use only one dataset to train the model, so we enable one TrainDatasetAdd node and bypass the other two. Here's how you can set it up:
2.2. Settings and Initialization
The Settings and Initialization section is where you configure the key components and parameters for FLUX LoRA Training. This section includes several essential nodes that work together to set up your training environment.
2.2.1. FluxTrainModelSelect
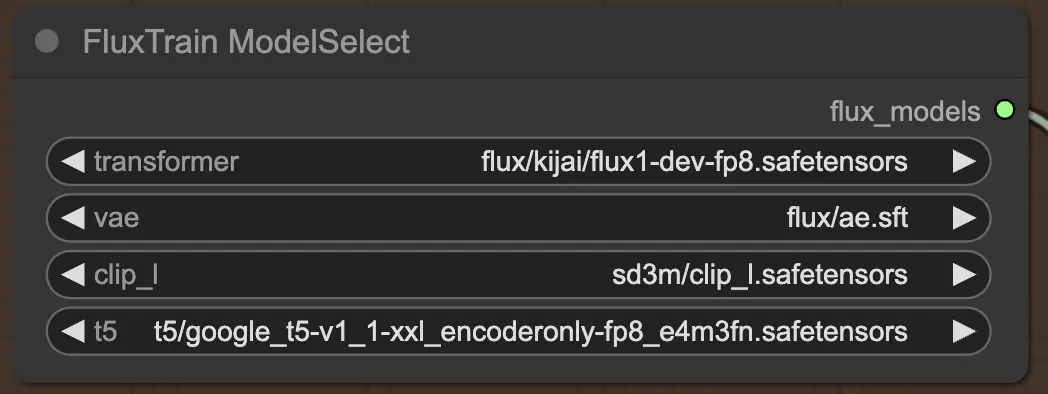
First, you have the FluxTrainModelSelect node, which is responsible for selecting the FLUX models that will be used during FLUX LoRA Training. This node allows you to specify the paths to four critical models: the transformer, VAE (Variational Autoencoder), CLIP_L (Contrastive Language-Image Pre-training), and T5 (Text-to-Text Transfer Transformer). These models form the backbone of the FLUX training process, and all have been set up on the RunComfy platform.
2.2.2. OptimizerConfig
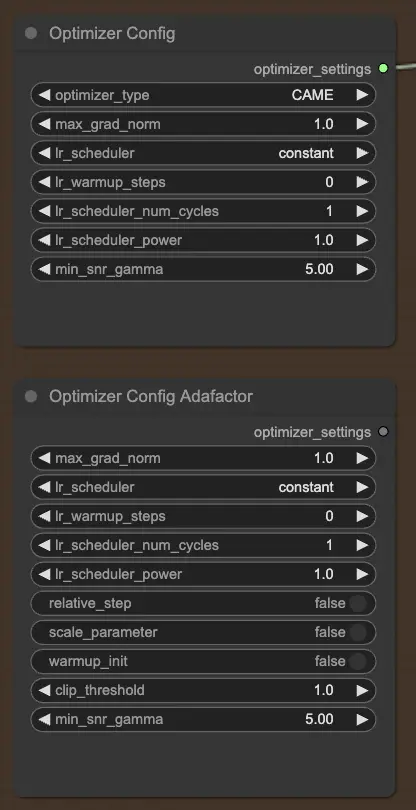
The OptimizerConfig node is crucial for setting up the optimizer within FLUX LoRA Training, which determines how the model's parameters are updated during training. You can choose the optimizer type (e.g., AdamW, CAME), set the maximum gradient norm for gradient clipping to prevent exploding gradients, and select the learning rate scheduler (e.g., constant, cosine annealing). Additionally, you can fine-tune optimizer-specific parameters like warmup steps and scheduler power, and provide extra arguments for further customization.
If you prefer the Adafactor optimizer, known for its memory efficiency and ability to handle large models, you can use the OptimizerConfigAdafactor node instead.
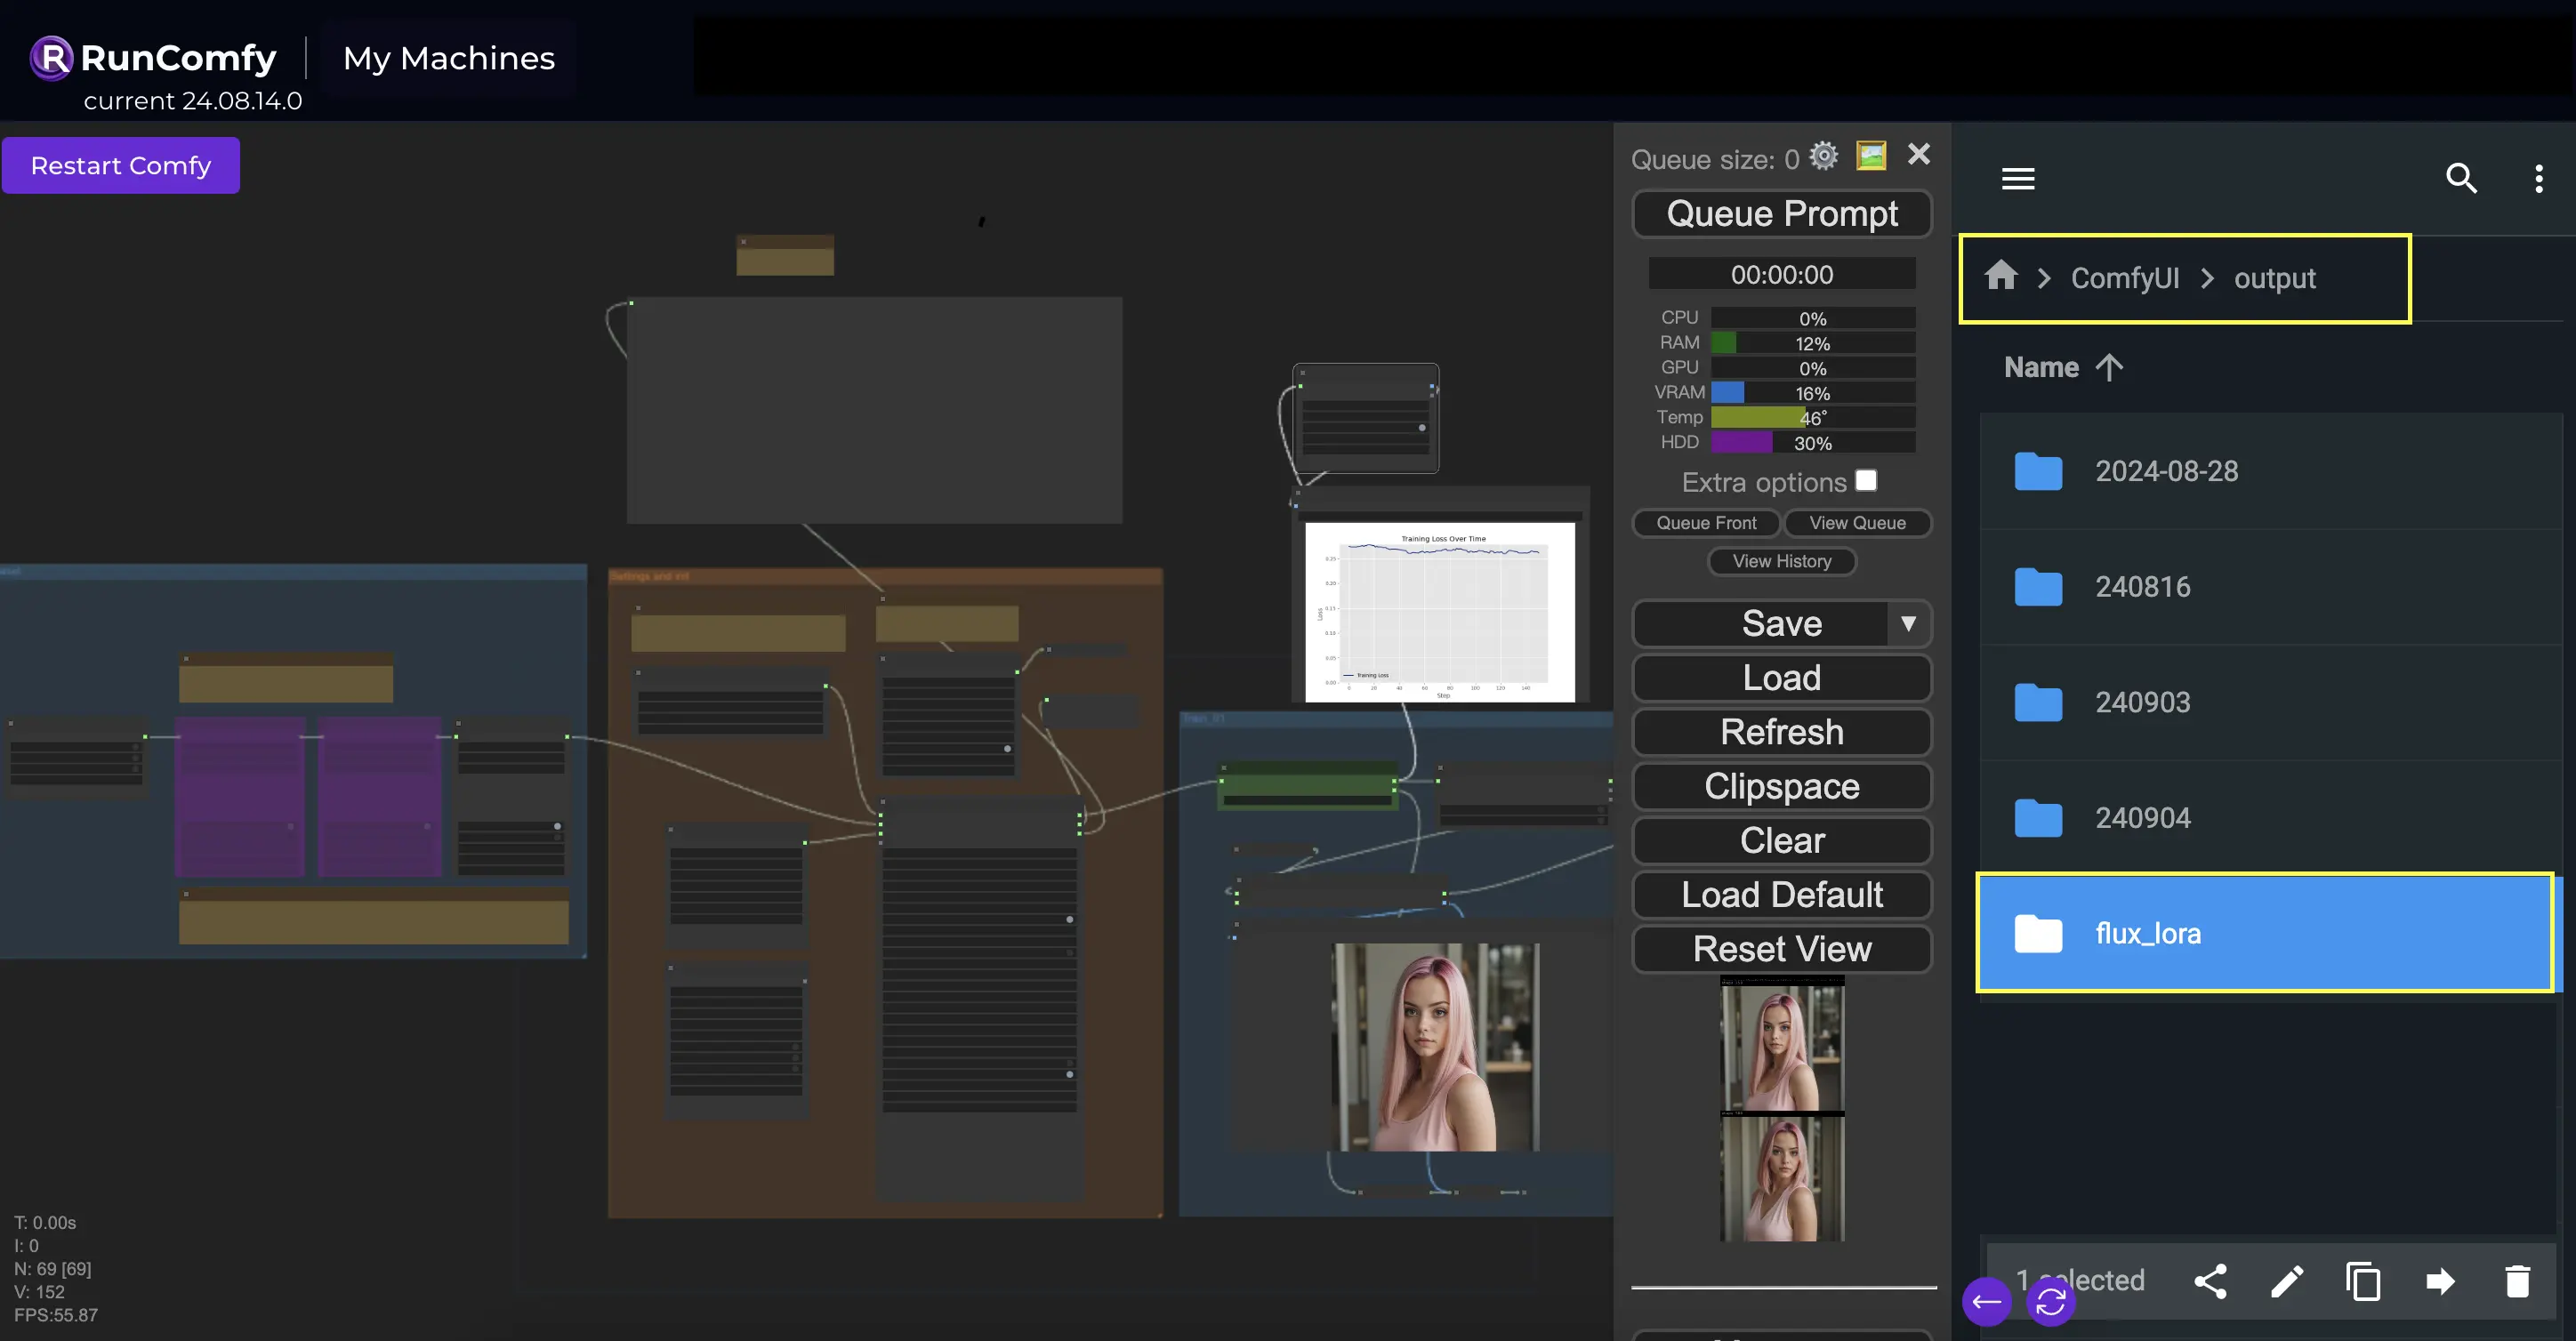
2.2.3. InitFluxLoRATraining
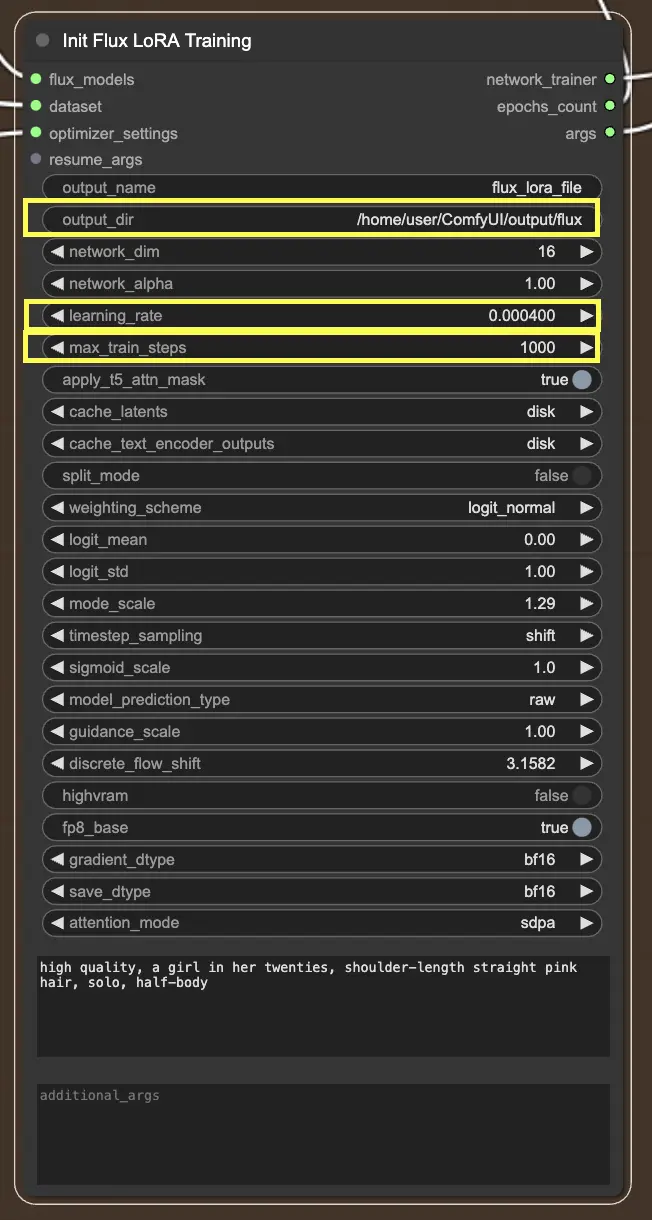
The InitFluxLoRATraining node is the central hub where all the essential components converge to kickstart the FLUX LoRA Training process.
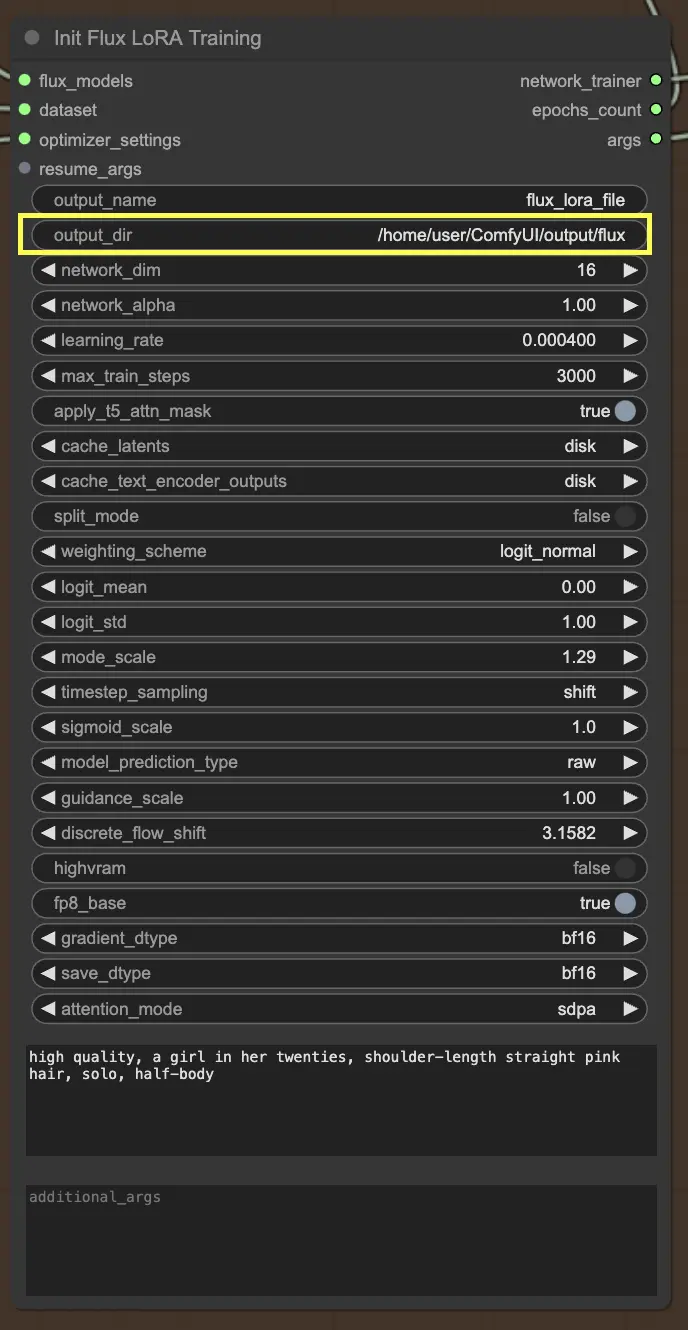
Output directory: FLUX LoRA Path
One of the key things you'll need to specify in the InitFluxLoRATraining node is the output directory, where your trained model will be saved. On the RunComfy platform, you can choose /home/user/ComfyUI/output/{file_name} as the location for your output. Once the training is complete, you will be able to view it in the file browser.
Network dimensions and learning rates
Next, you'll want to set the network dimensions and learning rates. The network dimensions determine the size and complexity of your LoRA network, while the learning rates control how quickly your model learns and adapts.
Max train steps
Another important parameter to consider is the max_train_steps. It determines how long you want the training process to run, or in other words, how many steps you want your model to take before it's fully baked. You can adjust this value based on your specific needs and the size of your dataset. It's all about finding that sweet spot where your model has learned enough to produce mouth-watering outputs!
2.3.4. FluxTrainValidationSettings
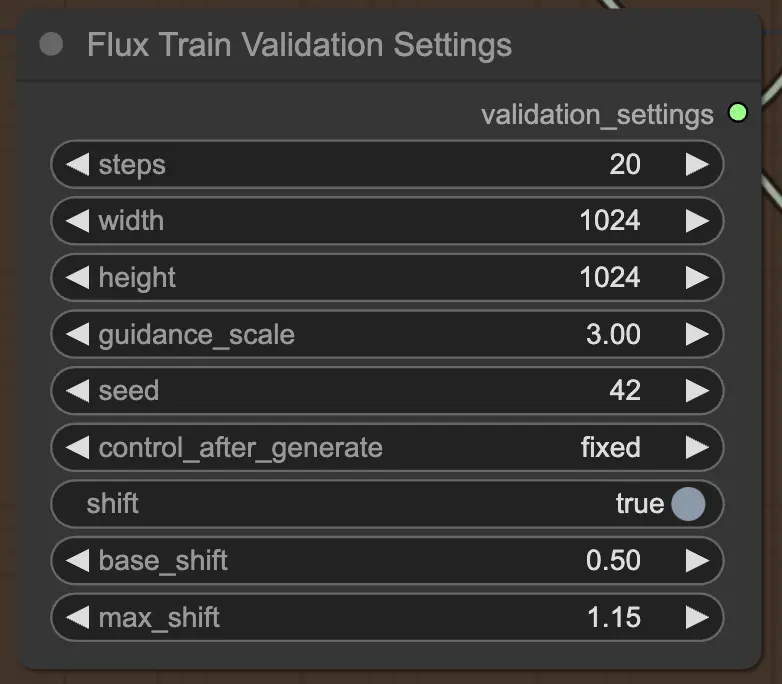
Finally, the FluxTrainValidationSettings node allows you to configure the validation settings for evaluating your model's performance during the FLUX LoRA Training process. You can set the number of validation steps, image size, guidance scale, and seed for reproducibility. Additionally, you can choose the timestep sampling method and adjust the sigmoid scale and shift parameters to control the timestep scheduling and improve the quality of the generated images.
3. Train
The Train section of FLUX LoRA Training is where the magic happens. It's divided into four parts: Train_01, Train_02, Train_03, and Train_04. Each of these parts represents a different stage in the FLUX LoRA Training process, allowing you to gradually refine and improve your model.
3.1. Train_01
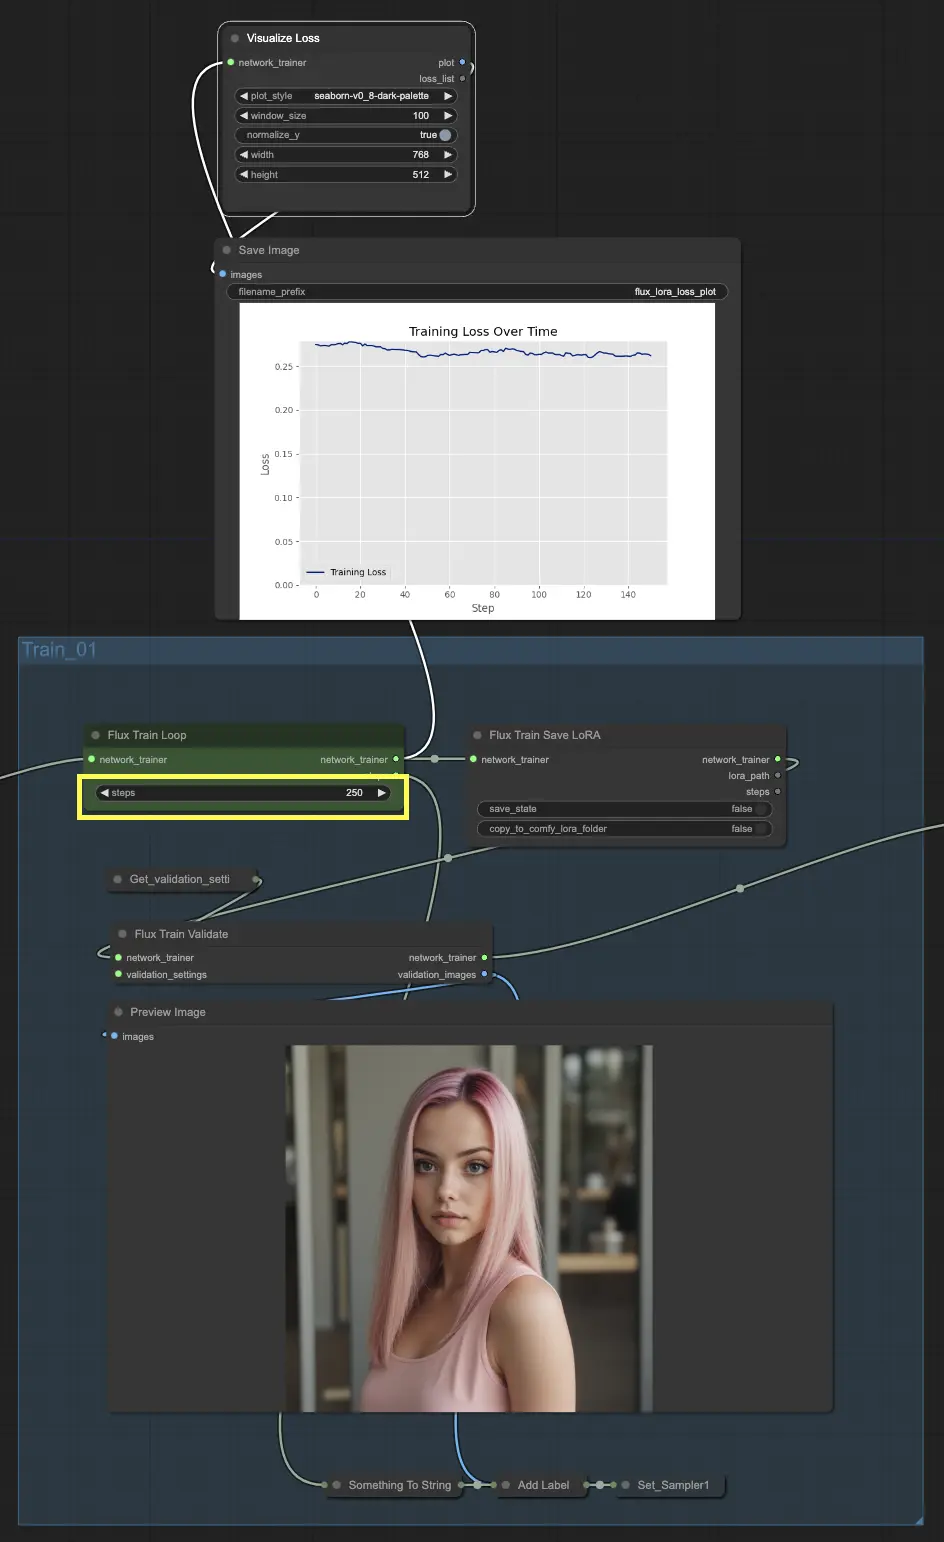
Let's start with Train_01. This is where the initial training loop takes place. The star of this section is the FluxTrainLoop node, which is responsible for executing the training loop for a specified number of steps. In this example, we've set it to 250 steps, but you can adjust this based on your needs. Once the training loop is complete, the trained model is passed to the FluxTrainSave node, which saves the model at regular intervals. This ensures that you have checkpoints of your model at different stages of training, which can be useful for tracking progress and recovering from any unexpected interruptions.
But training isn't just about saving the model. We also need to validate its performance to see how well it's doing. That's where the FluxTrainValidate node comes in. It takes the trained model and puts it to the test using a validation dataset. This dataset is separate from the training data and helps assess how well the model generalizes to unseen examples. The FluxTrainValidate node generates sample images based on the validation data, giving you a visual representation of the model's output at this stage.
To keep an eye on the training progress, we have the VisualizeLoss node. This handy node visualizes the training loss over time, allowing you to see how well the model is learning and whether it's converging towards a good solution. It's like having a personal trainer who keeps track of your progress and helps you stay on track.
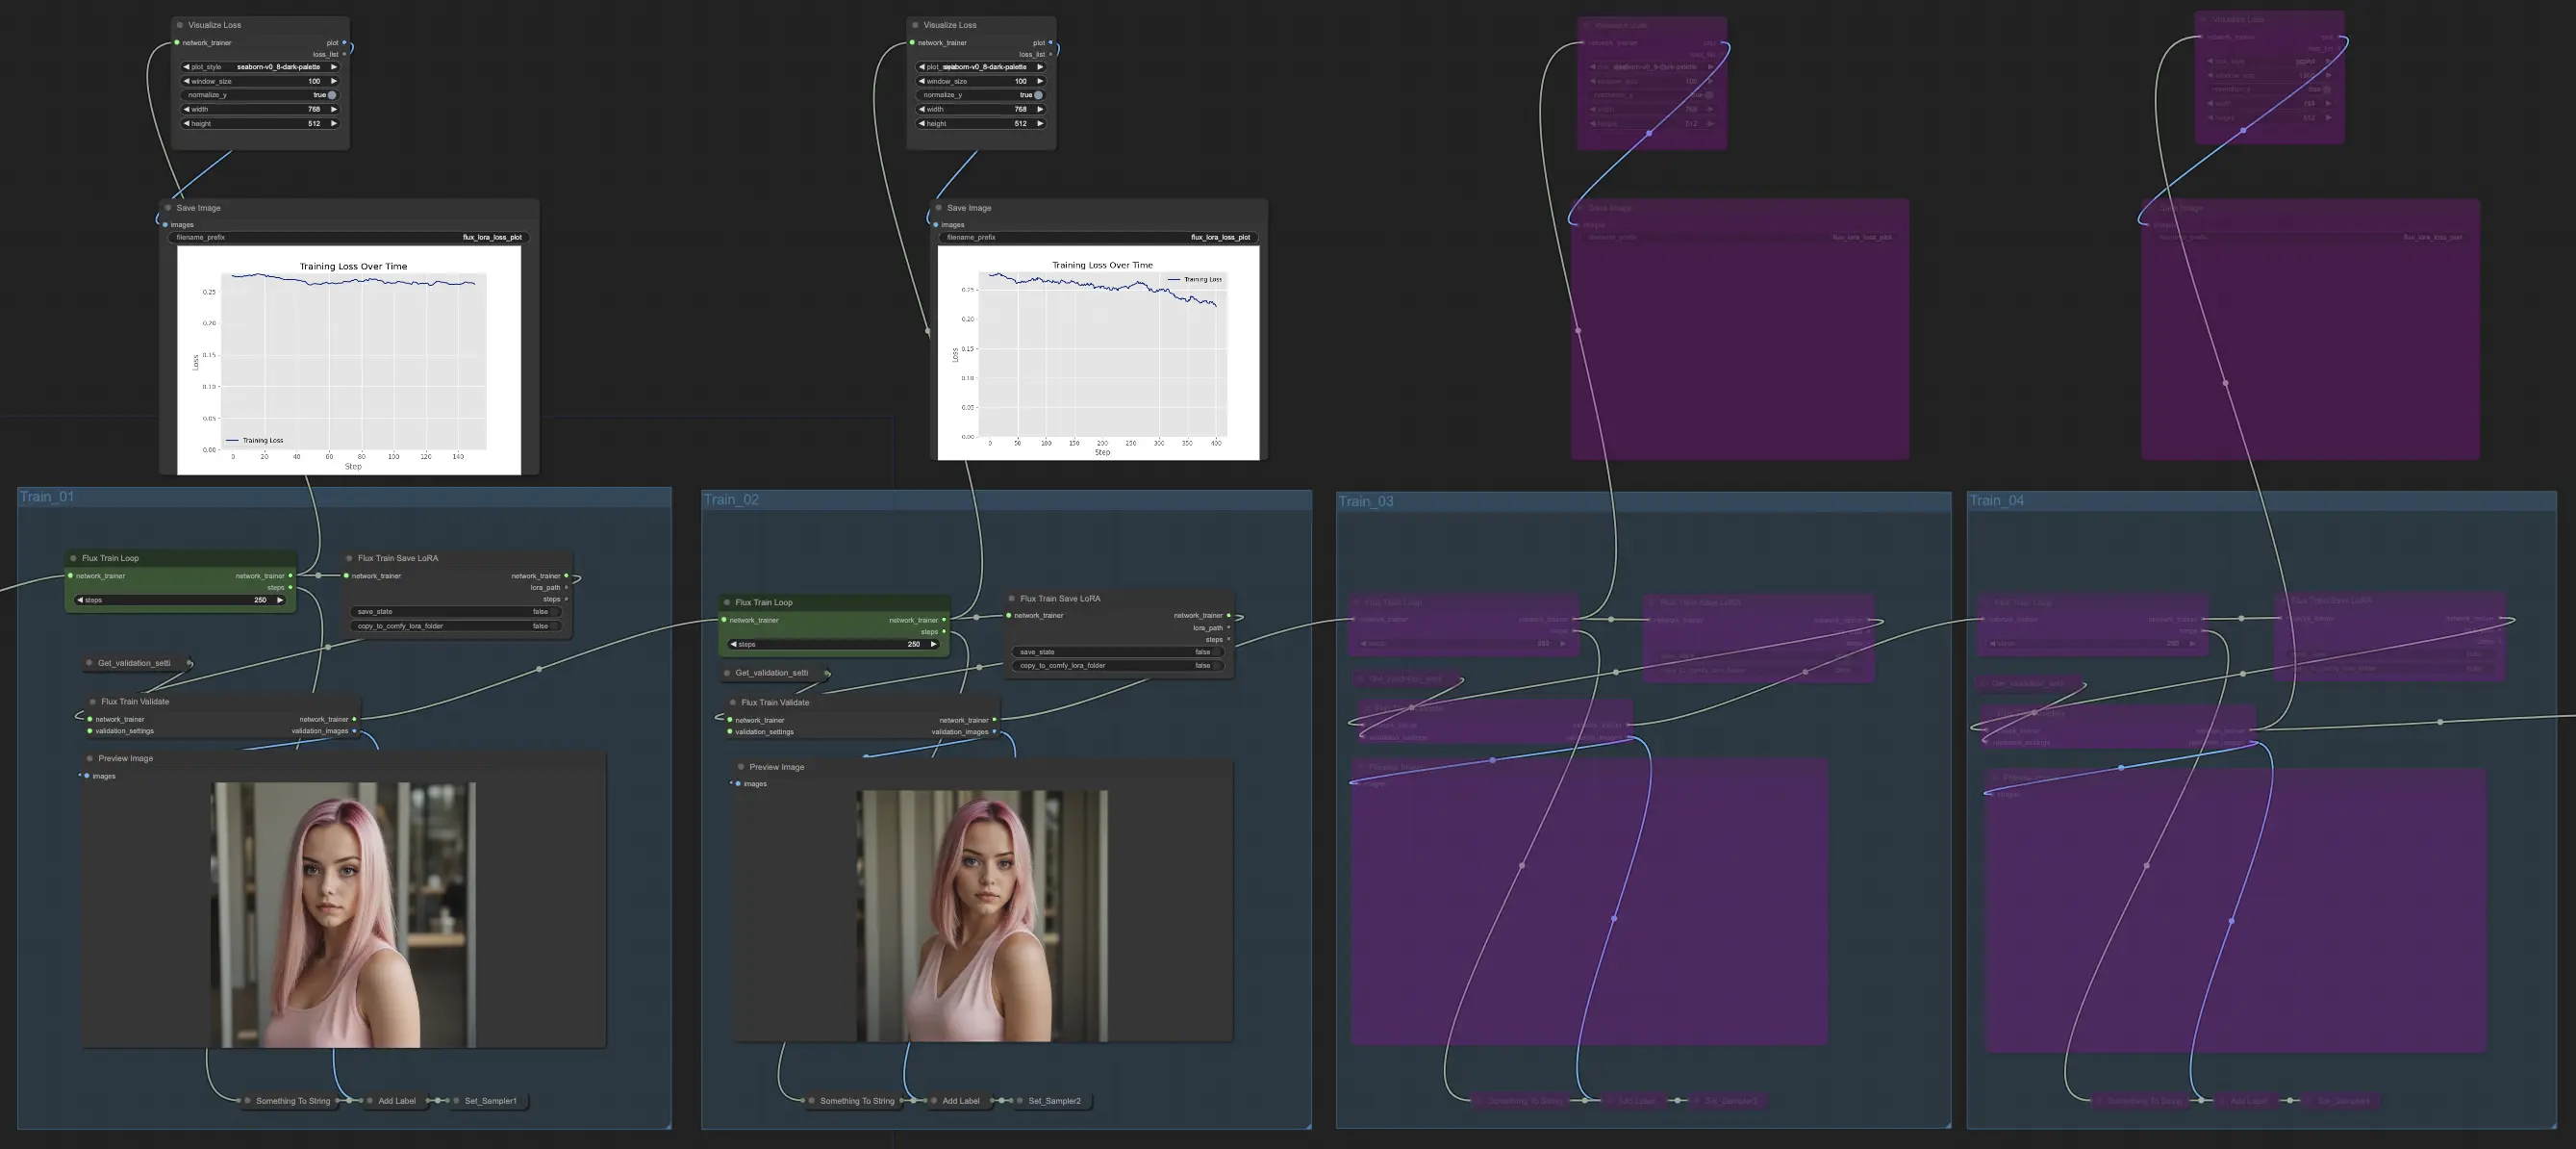
3.2. Train_02, Train_03, Train_04
In Train_02, continuing from Train_01 in the FLUX LoRA Training, the output is further trained for an additional specified number of steps (e.g., 250 steps). Train_03 and Train_04 follow a similar pattern, extending training with updated connections for a smooth progression. Each stage outputs a FLUX LoRA model, allowing you to test and compare performance.
Example
In our example, we've chosen to use only Train_01 and Train_02, each running for 250 steps. We've bypassed Train_03 and Train_04 for now. But feel free to experiment and adjust the number of training sections and steps based on your specific needs and resources.
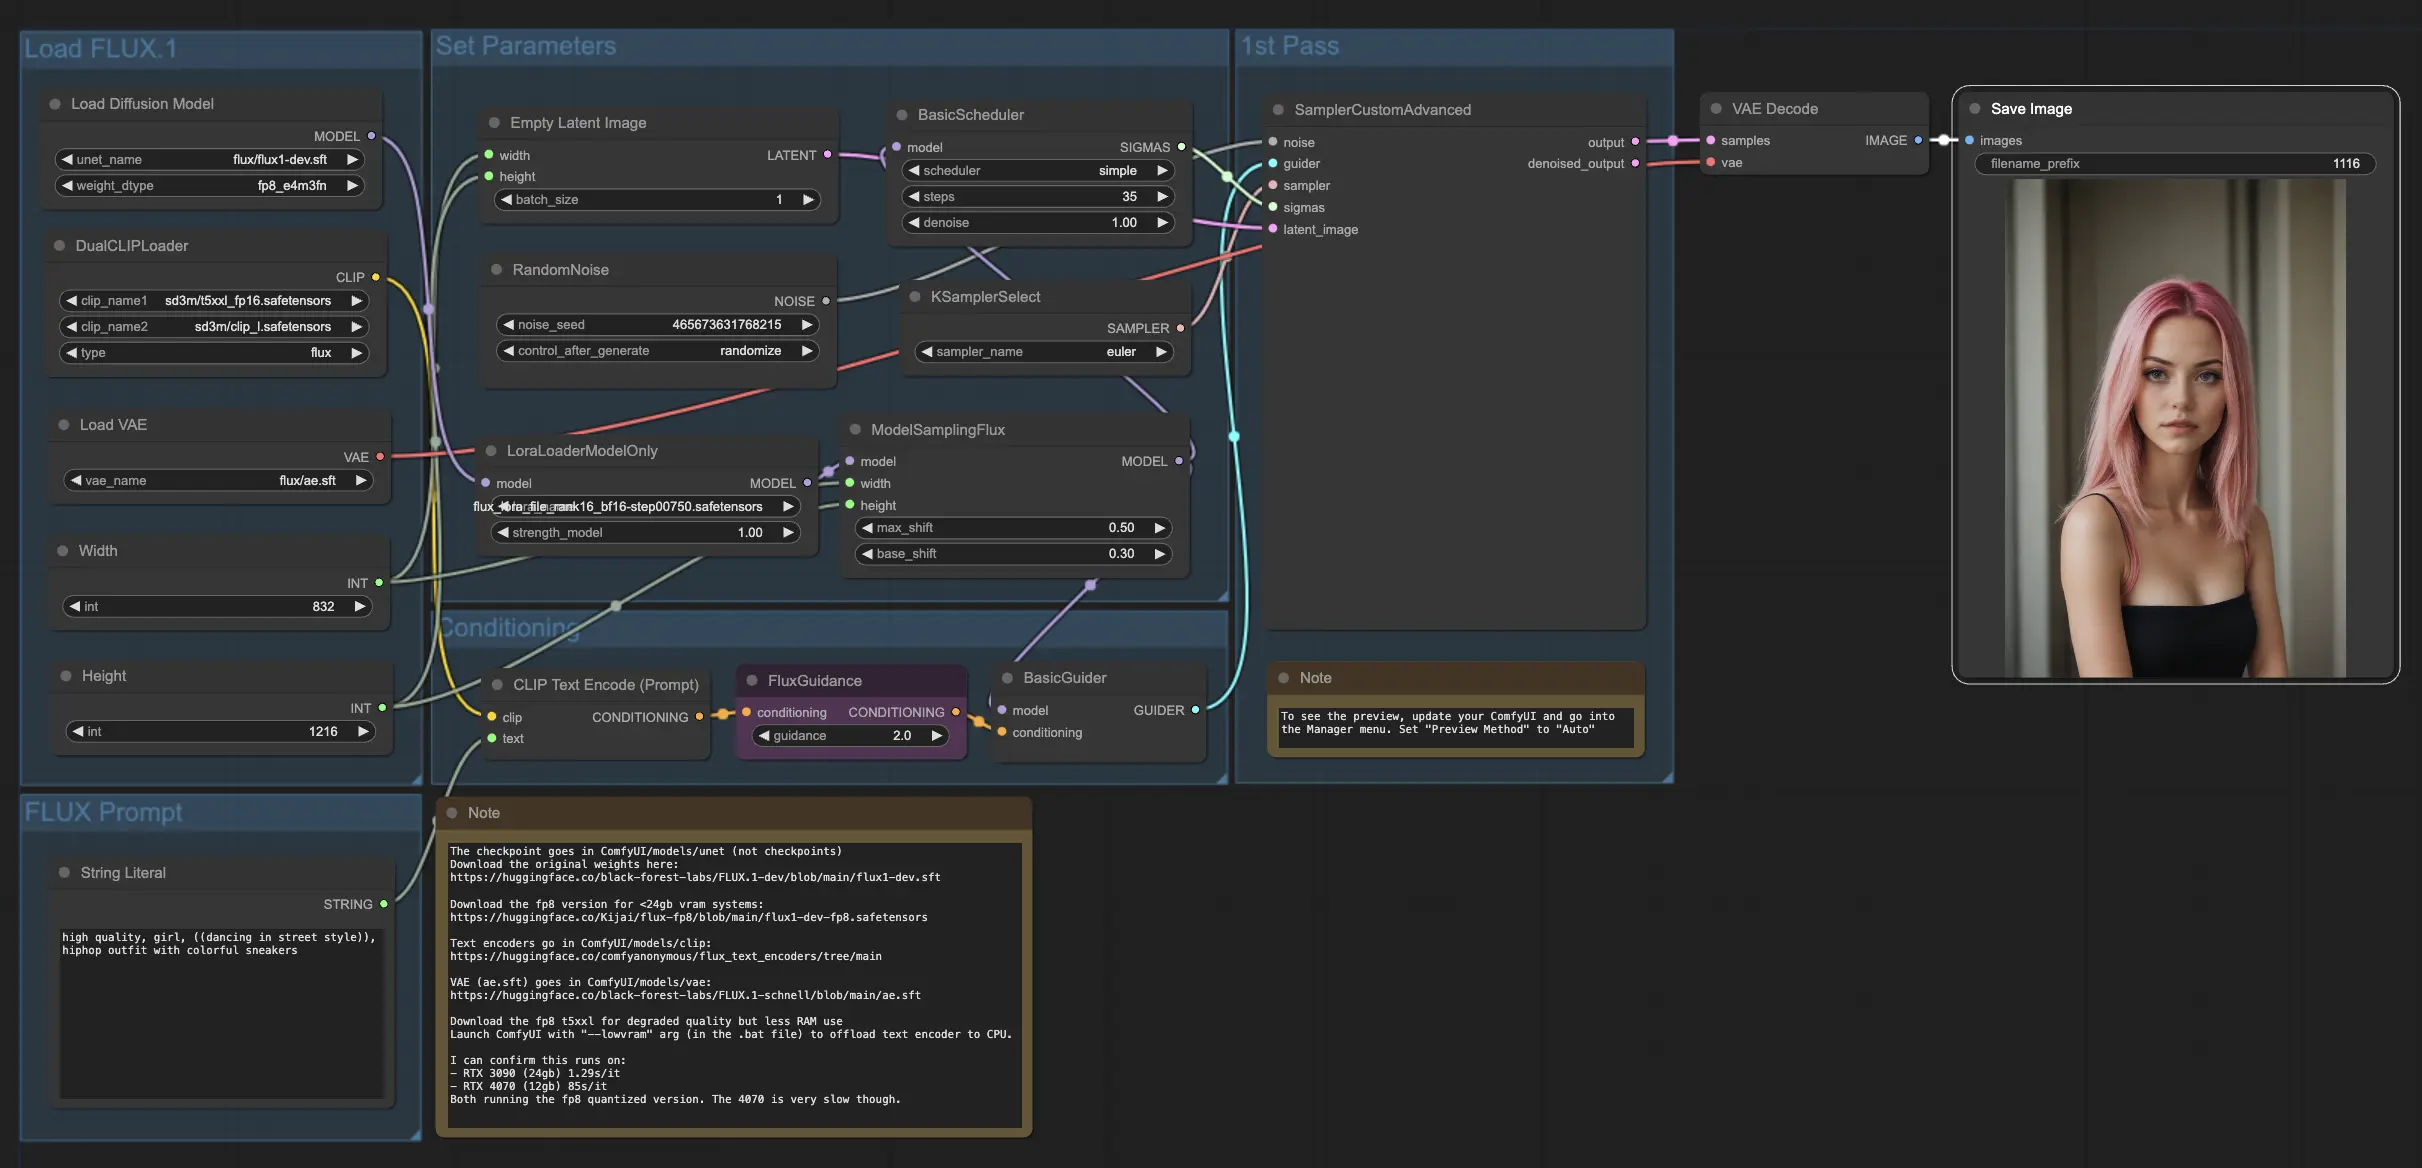
4. How and Where to Use the FLUX and FLUX LoRA Models
Once you have the FLUX LoRA model, you can incorporate it into the FLUX LoRA workflow. Replace the existing LoRA model with your trained model, then test the results to evaluate its performance.
Example
In our example, we use the FLUX LoRA workflow to generate more influencer images by applying the FLUX LoRA model and observing its performance.
License
View license files:
flux/model_licenses/LICENSE-FLUX1-dev
flux/model_licenses/LICENSE-FLUX1-schnell
The FLUX.1 [dev] Model is licensed by Black Forest Labs. Inc. under the FLUX.1 [dev] Non-Commercial License. Copyright Black Forest Labs. Inc.
IN NO EVENT SHALL BLACK FOREST LABS, INC. BE LIABLE FOR ANY CLAIM, DAMAGES OR OTHER LIABILITY, WHETHER IN AN ACTION OF CONTRACT, TORT OR OTHERWISE, ARISING FROM, OUT OF OR IN CONNECTION WITH USE OF THIS MODEL.